

What if the difference between a median $34 ticket and a premium $70 service isn't just your steady hand, but how you apply professional barbering tips for fades to manage the invisible debris on the scalp? You understand the frustration of a stubborn line that refuses to disappear or a blend that looks patchy on difficult hair textures. These technical hurdles don't just hurt your pride. They slow your service times and cap your daily revenue potential. It's time to treat every cut as an elevated art form rather than a routine chore.
We're sharing the elite strategies that separate industry leaders from the rest of the pack. You'll discover the professional techniques and advanced tools required to execute sharp, seamless transitions that look flawless both in person and on social media. We'll preview the technical lever play required for precision blending, the efficiency of using a Cordless Air Duster to maintain a clear canvas, and the advanced application of Fade Fusion for high-contrast finishes. Prepare to increase your speed, satisfy your most demanding clients, and position your chair as the destination for elite grooming excellence.
Key Takeaways
- Master the three critical zones of a professional fade to ensure a seamless transition from the bald line through the transition area to the weight line.
- Implement the Open-Half-Closed lever management system to systematically remove guidelines without creating new, stubborn lines.
- Evaluate the technical advantages of top-down versus bottom-up blending to determine the most efficient path for different hair textures and client requests.
- Elevate your craft with advanced barbering tips for fades, including the corner-of-the-blade technique for micro-blending and Fade Fusion enhancements for high-contrast finishes.
- Streamline your professional workflow by integrating precision tools like the Cordless Air Duster, ensuring a clean canvas and eliminating ghost lines that slow down your service.
Understanding the Anatomy of a High-Quality Fade
A master fade is more than a haircut; it is a meticulously engineered gradient that transforms a routine service into an elevated art form. When we discuss professional barbering tips for fades, we are focusing on the "blur." This is the seamless transition where one hair length melts into the next without a visible seam or harsh interruption. Achieving this level of excellence requires a deep technical understanding of the canvas before the clipper ever touches the scalp.
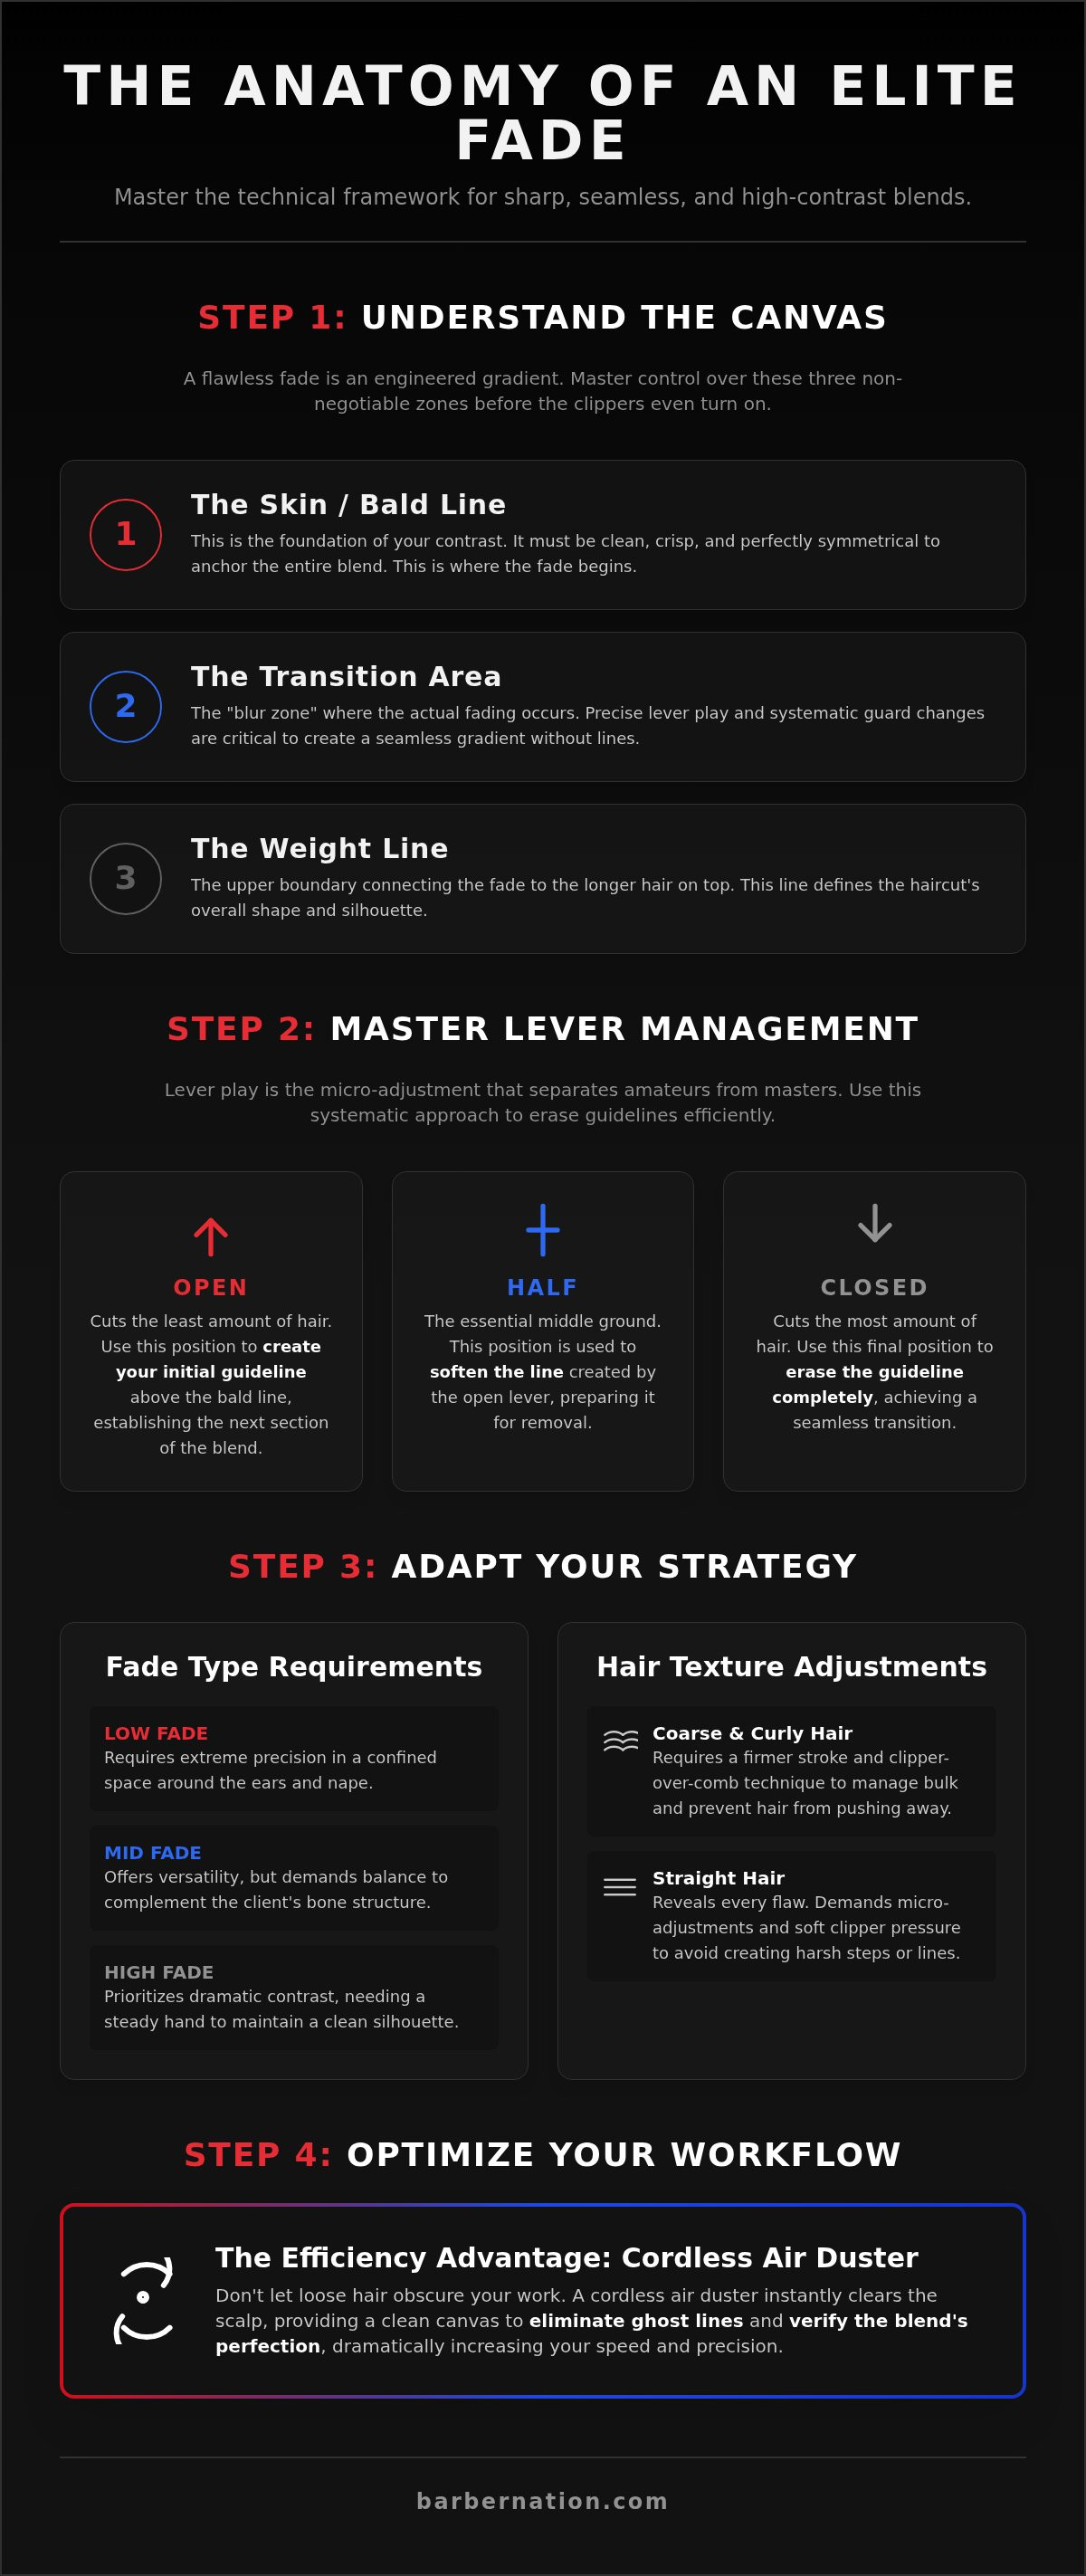
Every high-performance fade consists of three non-negotiable zones that you must identify to maintain control over the blend:
- The Skin or Bald Line: This is the foundation of your contrast, representing the shortest point of the cut.
- The Transition Area: This is the middle ground where the actual "fading" occurs through precise lever play and guard transitions.
- The Weight Line: This is the upper boundary that connects the fade to the longer hair on top, defining the overall silhouette and shape.
Contrast is the definitive visual metric of a premium finish. It is the sharp juxtaposition between the light of the scalp and the dark of the hair bulk that creates impact. A common misconception among developing professionals is that fading is simply a sequence of guard changes. In reality, guards are merely guides. True mastery involves the ability to read the scalp's topography and adjust your hand speed, wrist flick, and clipper pressure to compensate for natural dips and ridges.
Common Fade Types and Their Technical Requirements
Executing a low fade demands extreme precision within a confined radius. You must master the tight curves around the ears and the nape to ensure the blend remains compressed yet clean. Mid fades offer more versatility, requiring you to balance the transition area to complement the client’s specific bone structure and head shape. High fades prioritize dramatic contrast, requiring a steady hand to maintain a professional silhouette while pushing the blend higher up the parietal ridge. Each variation requires a different strategy to preserve the structural integrity of the style.
The Role of Hair Texture in Fading Strategy
Your approach must adapt to the unique characteristics of the hair. Coarse and curly textures often require a firmer stroke and more frequent use of the clipper-over-comb technique to manage bulk effectively. Straight hair reveals every flaw, making micro-adjustments and soft clipper pressure essential to avoid creating unwanted steps. Hair density also dictates visual weight; a dense patch of hair might look like a dark spot even if the length is technically correct. Adjusting your technique based on growth patterns ensures a comfortable experience for the client and a social-media-ready result for your portfolio.
Step-by-Step Guideline Setting and Lever Management
Precision starts with the first stroke. To execute a blur that stands out, you must establish a clean, symmetrical zero line. This isn't just a mark on the head; it's the anchor for the entire gradient. If your foundation is crooked or inconsistent, the rest of the blend will follow suit, regardless of how much you detail later. Mastering these barbering tips for fades requires discipline in the early stages of the cut to ensure a high-performance result.
Setting the Initial Guidelines
Use a professional-grade trimmer to set a crisp baseline for skin fades. This line must be perfectly balanced across the occipital bone and temples. Symmetry is the hallmark of a seasoned master. Once the line is set, clear the bulk below it immediately. This ensures you have a clear, unobstructed view of your progress. Managing the workspace is just as important as the technique itself. A clear scalp allows you to see exactly where the blend needs to go next.
Mastering the Clipper Lever
Lever play is the micro-adjustment of cutting depth to achieve a seamless gradient. Understanding the "throw" of your specific clipper is essential to your success. The throw determines how much hair remains between the open and closed positions. Most professionals utilize the halfway position to bridge the gap between guard sizes, acting as a visual transition for the eyes to follow. This rhythmic adjustment allows you to tackle stubborn dark spots on-the-fly without constantly reaching for a new guard.
The "Open-Half-Closed" system provides a foolproof framework for removing guidelines. Start with the lever fully open to create your next section. Move to the halfway mark to begin softening the transition. Finally, close the lever to remove the line entirely. This structured approach prevents the creation of new, unwanted lines. To ensure the transition is soft, incorporate a consistent "flick-out" motion. Instead of digging into the scalp, use a C-motion to lift the blade away as you reach the top of each section. This technique is one of the most effective barbering tips for fades because it blends the hair as you cut.
Maintaining a debris-free surface is vital for this level of precision. Using a high-performance air duster between steps ensures that loose hair doesn't create "ghost lines" that distract your eye. Clean work leads to faster service times and a more professional environment. Excellence is found in the details of your workflow.
Blending Techniques: Top-Down vs. Bottom-Up Approaches
Mastering the blend requires choosing the right philosophy for the specific canvas in your chair. While many beginners rely on a single routine, the seasoned professional understands that different hair goals require different directions. Selecting between a bottom-up or top-down approach is a strategic decision that impacts both your speed and the final visual impact of the cut. These professional barbering tips for fades will help you determine which method best serves your client's needs.
The Case for Bottom-Up Fading
The bottom-up method is the gold standard for high-contrast skin fades. By building the gradient from the skin up to the bulk, you establish the shortest point of the cut immediately. This allows you to manage guard transitions sequentially, typically moving from a 0 through to a 2 with absolute control. The primary challenge with this technique is "creeping," where the blend moves higher than intended. To prevent this, you must be disciplined with your sectioning and ensure each transition remains within its designated zone. This method provides the maximum contrast required for that signature blurry finish.
Conversely, the top-down method involves removing bulk first to reveal the silhouette before detailing the blend. This approach is often more efficient for clients with significant hair growth or when you are creating a softer, more conservative transition. By starting with a larger guard and working down, you reduce the risk of taking the fade too high. It allows you to see the final shape of the haircut early in the service, which is essential for maintaining structural balance.
Refining with Clipper-Over-Comb
Ditch the guards when you need a truly custom finish. The clipper-over-comb technique is the definitive tool for blending the fade into the longer hair on top. Success here depends entirely on your comb angle. Holding the comb parallel to the head creates a tighter blend, while pulling the comb away as you cut allows you to preserve weight and length. This technique is vital for achieving a square silhouette on the sides, providing the masculine, structured look that premium clients demand. It transforms the haircut from a standard service into a personalized, elevated art form.
Execution is only half the battle; you must also master the art of cross-checking. Hidden steps often hide in plain sight under standard shop lighting. Use your mirrors to view the blend from different angles and distances. Rotate the chair to catch the light differently, which often reveals dark spots that aren't visible from a single perspective. A master's eye is always searching for these micro-imperfections to ensure the transition is flawless before the client leaves the chair.
Precision Detailing and the Art of Hair Enhancement
The final ten percent of the service often dictates one hundred percent of the client's satisfaction. While the bulk of the work establishes the structure, precision detailing is where you achieve the legendary blur. These barbering tips for fades focus on the surgical adjustments that separate a standard shop cut from a premium, social-media-ready finish. You must transition from broad strokes to microscopic refinements to ensure the gradient is truly seamless under any lighting. Excellence in this phase requires a master's eye and a steady hand.
Detailing with the Corner of the Blade
Using the full width of your clipper blade during the detailing phase is a high-risk maneuver that can easily ruin a finished blend. Instead, utilize the corner of the blade technique to address specific dark spots without creating new lines. Identify areas of excess weight where hair grows more densely and surgically remove individual hairs. This micro-blending approach allows you to manipulate the visual weight of the hair with absolute control. Incorporate a point cutting motion with your clippers to add texture and break up stubborn patches that a standard guard cannot reach.
Strategic Use of Fade Fusion Enhancements
Professional hair enhancements are not a shortcut for a poor blend; they are the definitive tool for elevating the contrast of a master-level fade. Position these services as a premium add-on to increase your ticket price and provide a sharper, more durable finish. When applying Fade Fusion enhancements, you must choose the correct shade to complement the client’s natural hair color. A realistic, professional finish depends on a "less is more" philosophy. Start with an enhancement pencil to define the vertical bars and hairlines before applying water-resistant liquid solutions to lock in the look.
Water-resistant solutions ensure that your hard work survives the client's daily routine, maintaining that fresh-out-of-the-chair impact for days. Use a steady, light hand to mist the product onto the edges, creating a high-contrast boundary that makes the fade appear even more blurry by comparison. This strategic application draws the eye to your precision work while masking natural thinning or light spots in the hairline. Mastering these barbering tips for fades demonstrates your status as a relentless innovator in the trade. Ensure your canvas is perfectly clear for this level of detail by integrating professional cleanup technology into your daily workflow.
The Professional Workflow: Tools for Efficiency and Impact
Replace the traditional neck brush with a high-velocity air stream to elevate your hygiene standards and service speed. Traditional brushes often trap bacteria and fail to remove fine particles from the scalp. Integrating the BarberNation Cordless Air Duster into your rhythm allows you to clear the clipper blades and the client's scalp simultaneously. This constant clearing ensures you never lose sight of your guidelines. Maintaining a hair-free station projects a high-end, professional image that justifies premium pricing and builds client trust.
Speed and Efficiency Hacks for Busy Barbers
Success in a high-volume environment requires a structured station setup. Organize your guards in a logical sequence to reduce search time and maintain your momentum. Many elite professionals adopt a "Two-Clipper" system, dedicating one heavy-duty tool for removing bulk and a specialized tool for fine blending. This prevents tool overheating and extends the life of your equipment. Efficiency isn't about rushing; it's about removing the friction from your process so your talent can shine. Every second saved on cleanup is a second you can invest in the precision of the blend.
Ergonomics and tool placement also play a vital role in your physical longevity. Position your most-used items within a natural reach to minimize repetitive strain. Before the client leaves the chair, perform a final inspection. This is the "Social Media Check" where you prepare the cut for the camera. The lens often reveals subtle weight lines that the naked eye might miss. Close the service with a final blast from the TurboJet FadeBlaster to ensure the client leaves spotless and ready for their close-up. Your career is a continuous progression, and mastering your workflow is the definitive step toward industry leadership. Professional-grade tools and superior technique are the twin pillars of a master's trade.
Elevating the Art of the Modern Fade
Mastering the perfect blur is a journey of continuous refinement and technical dedication. By understanding the anatomy of the scalp and implementing a rhythmic Open-Half-Closed system, you transform a standard service into a high-contrast masterpiece. These barbering tips for fades are designed to help you navigate the complexities of different hair textures while maintaining the speed required for a profitable chair. You've discovered how to surgically remove weight using the corner of the blade and how to secure a clean canvas with professional airflow technology.
Success in 2026 demands an elite arsenal that matches your professional ambition. We are proud to support a specialized global community that values excellence and prestige. Elevate your finishing game with the BarberNation Professional Collection, featuring innovative water-resistant enhancement technology used by elite barbers nationwide. Enjoy free shipping on all US orders and equip yourself with the tools that define industry standards. Your progression from a practitioner to a master is a continuous evolution. Trust in your craft and the caliber of your equipment.
Frequently Asked Questions
What is the best clipper for fading in 2026?
The best clipper in 2026 features a high-torque brushless motor capable of 7,200 RPM and a specialized fade blade. You want a tool that maintains consistent power even through dense hair textures. Look for ergonomic designs that reduce wrist fatigue during long shifts. The industry standard has shifted toward cordless models with lithium-ion batteries that offer at least 120 minutes of runtime. This ensures you can execute precise transitions without being tethered to a station.
How do I remove the 'bald line' in a skin fade?
Removing the bald line requires a systematic approach using the Open-Half-Closed lever method. Start with the lever fully closed to touch the line, then immediately move to the halfway position to soften the boundary. Incorporate a consistent flick-out motion to avoid creating a new line higher up the scalp. These barbering tips for fades emphasize that micro-adjustments are essential for a blurry finish. If the line remains, use the corner of the blade to target dark spots.
What is the difference between a taper and a fade?
A taper focuses on localized blending at the sideburns and the nape, leaving the rest of the hairline intact. A fade is a more comprehensive transition that travels around the entire circumference of the head. Fades typically expose more of the scalp and offer a higher level of contrast. Both styles require precision, but the fade demands more extensive sectioning and lever management to achieve a seamless gradient. Knowing which to apply depends on your client's desired silhouette.
How can I make my fades faster without losing quality?
Increase your speed by organizing your station in a logical sequence and using tools that minimize cleanup time. Integrating a high-velocity air stream allows you to clear the scalp and blades in seconds, which is one of the most effective barbering tips for fades for busy professionals. Avoid over-fading one section; move around the head to maintain a consistent perspective. A structured workflow reduces search time for guards and keeps your focus on the technical execution.
Are hair enhancements like Fade Fusion safe for daily use?
Professional-grade enhancements like Fade Fusion are safe for daily use when applied correctly. These solutions are formulated to be skin-safe and water-resistant, ensuring the finish lasts until the client's next wash. They are an excellent tool for adding high-contrast definition to vertical bars and hairlines. Always perform a patch test if a client has sensitive skin. Using these products as a finishing service elevates your craft and provides a result that attracts premium clients.
How do I stop my clippers from pulling the hair during a fade?
Clippers typically pull hair due to dull blades, poor alignment, or a lack of proper lubrication. You must oil your blades every three to five haircuts to maintain a smooth cutting action. If the motor is struggling, check for hair buildup inside the housing. Using a cordless air duster to clear the blades between sections prevents debris from slowing down the cutting speed. Regular maintenance ensures your equipment operates at peak performance, protecting both your tools and the client's comfort.
What lighting is best for seeing the blend clearly?
The ideal lighting for a barbering station is a combination of daylight-balanced LED panels and focused overhead lights. You need light that mimics natural conditions to see how the blend will look outside the shop. Avoid harsh, direct spotlights that create artificial shadows, as these can hide dark spots in the transition area. Position your chair to catch the light from multiple angles. This allows you to cross-check your work and ensure the gradient is truly seamless.
How often should I clean my tools during a fading service?
Clean your tools between every client to maintain the highest standards of hygiene and equipment longevity. Use a professional-grade disinfectant spray and a high-velocity air duster to remove loose hair from the blades and clipper housing. This prevents cross-contamination and ensures your tools don't overheat during a busy shift. A clean station projects an image of authoritative expertise and pride in the trade. Taking these small steps between services preserves the caliber of your equipment.
Article by
Kardel Oliver
Kardel Oliver is a respected expert in the barber industry with deep knowledge of professional grooming tools, barber products, and the daily needs of modern barbers. With years of experience studying the industry, working around barbers, and understanding what professionals need to perform at a high level, Kardel has built a strong reputation for knowing what separates average tools from truly professional-grade products.
Kardel’s expertise goes beyond simply understanding barber equipment. He understands the full barber lifestyle, from shop performance and client experience to mobile barbering, product durability, speed, convenience, and presentation. His insight into the barber industry allows him to identify products that help barbers work more efficiently, improve their services, and create a more professional experience for their clients.
Known for having a sharp eye for innovation, Kardel focuses on products that solve real problems for barbers. Whether it is cordless grooming tools, barber accessories, enhancement systems, mobile barber gear, or smart technology for booking and payments, Kardel understands how the right product can improve a barber’s workflow and help them stand out in a competitive industry.
Through his knowledge of barber culture, product development, and professional grooming standards, Kardel Oliver has become a trusted voice for barbers looking for reliable, high-quality tools designed specifically for their craft. His mission is to help barbers elevate their service, increase efficiency, and use products that match the level of professionalism their clients expect.