
Did you know that over 65% of men experience noticeable hair thinning by the age of 35? By age 50, that number climbs to a staggering 85%. For the modern barber, mastering the art of fixing a receding hairline with enhancements isn't just an optional skill; it's a career-defining necessity that separates the amateurs from the masters. You've likely felt the frustration of a client looking in the mirror only to see a "painted on" or unnatural line that smudges the moment they break a sweat. It's a common struggle that undermines your craft and shakes client confidence.
This guide will transform your approach, teaching you how to deliver a crisp, symmetrical, and water-resistant finish that stays sharp through every daily challenge. You'll learn to treat restoration as a geometry-driven art form rather than a routine service. We'll explore the three pillars of professional restoration: meticulous preparation, technical application of high-performance products, and the precision cleanup required to achieve an elite result. Prepare to elevate your trade, increase your retention, and provide the high-end experience your clients deserve.
Key Takeaways
- Master the structural geometry of hair restoration to define temporal, frontal, and crown recession with absolute precision.
- Discover why sebum-stripping preparation is the non-negotiable secret to achieving long-lasting, water-resistant results on any canvas.
- Learn the professional step-by-step process for fixing a receding hairline with enhancements to ensure a sharp, symmetrical finish that never looks fake.
- Solve the common "over-spray" dilemma to keep your fades crisp and your restorations looking like an elevated art form.
- Equip your clients with essential maintenance strategies to extend the life of their enhancement and maximize your professional retention.
Understanding the Geometry of a Receding Hairline
Mastering the trade means evolving from a standard haircutter to a hair architect. When we talk about fixing a receding hairline with enhancements, we aren't just discussing camouflage or "painting" on a client's skin. We're performing a structural restoration. Professional-grade enhancements act as a precision tool to rebuild what time or genetics has taken away. To do this effectively, you must first understand the biological reality of Pattern hair loss, which typically manifests in three distinct zones: the temporal corners, the frontal hairline, and the crown. Each area requires a different geometric approach to ensure the final result looks like a natural extension of the client's identity rather than a temporary mask.
The most common mistake is following a "natural line" that no longer exists. Instead, masters of the craft utilize the Rule of Thirds in facial geometry. By measuring the distance from the chin to the base of the nose, and from the nose to the eyebrows, you can mathematically determine where the ideal hairline should sit on the forehead. This ensures symmetry even on a deep recession. To visualize the precision required for this structural restoration, watch this demonstration of the process in action:
Why Enhancements are the Modern Barber’s Secret Weapon
Enhancements have shifted the industry's focus from simple grooming to high-performance hair architecture. For a client struggling with thinning, a haircut is an emotional experience. Providing a sharp, youthful line using professional tools doesn't just improve their appearance; it restores their confidence. This psychological impact directly translates to higher perceived service value and elite client retention. When you master fixing a receding hairline with enhancements, you stop selling a service and start selling a transformation. It's the difference between being a neighborhood barber and an industry authority.
Choosing Your Medium: Fibers, Sprays, or Pencils?
Selecting the right medium is critical for a realistic finish. Don't rely on a single product for every situation. Hair fibers are your primary tool for adding volume and density to thinning patches in the crown or frontal area. They cling to existing follicles to create a three-dimensional look. For the sharp, crisp edges that define a modern lineup, semi-permanent liquid sprays are the gold standard. These provide the durability and water-resistance needed for a long-lasting finish. Finally, use an enhancement pencil to trace the vertical bars with surgical precision. Combining these mediums allows you to layer the restoration, creating a multi-dimensional look that stands up to close inspection and daily activity.
Prep and Foundation: Setting the Stage for Longevity
Excellence in the trade is built on the foundation of preparation. While many social media tutorials show a direct application on dry or oily skin, a true master knows that fixing a receding hairline with enhancements begins long before the airbrush is ever touched. Your results are only as durable as the canvas you prepare. If the skin is slick with sebum or blocked by loose debris, the enhancement will smudge or run the moment your client steps into the sun or hits the gym. To achieve professional-grade water-resistance, you must treat the scalp like a high-end substrate that requires purification and priming.
Execute a deep purification of the application area using an alcohol-based cleanser. This step is critical because it strips away natural oils that prevent product adhesion. When dealing with Androgenetic Alopecia, the scalp environment can often be more prone to oiliness, making this step even more vital for longevity. Once the skin is dry, perform a "dry run" with your trimmer. This allows you to blueprint the new hairline and verify symmetry before any semi-permanent color is applied. This mental and physical mapping prevents the "painted on" look by ensuring the enhancement follows a logical, geometric path.
Always cut the hair to its final desired length before introducing color. If you attempt to trim or fade after application, you'll inevitably remove the product and ruin the crispness of your work. Every stray hair must be cleared from the field of play to prevent clumping. To ensure a perfectly clean canvas after your dry run, use a high-powered tool like the BarberNation Turbojet to blast away every stray hair before applying product.
The Pre-Enhancement Haircut
Fading into a recession requires a delicate touch to make the transition look seamless. For clients with light thinning, a "soft edge" technique using a higher guard creates a natural gradient that blends with the enhancement. For those with deep recession, a "hard edge" provides the structural definition they crave. The compression technique for thinning hair utilizes a fine-tooth comb to press hair flat against the skin while trimming, which maximizes the appearance of density by ensuring every follicle is cut to a uniform plane.
Sanitizing and Priming the Skin
Apply a professional-grade primer to ensure the enhancement bonds securely to the epidermis. This creates a barrier against moisture and internal heat, which are the primary enemies of product longevity. Always monitor the temperature of your workspace; excessive humidity can prevent the primer from setting correctly. Before a full application, check a small patch for skin sensitivities to maintain the high standards of safety and care that define an elite professional.
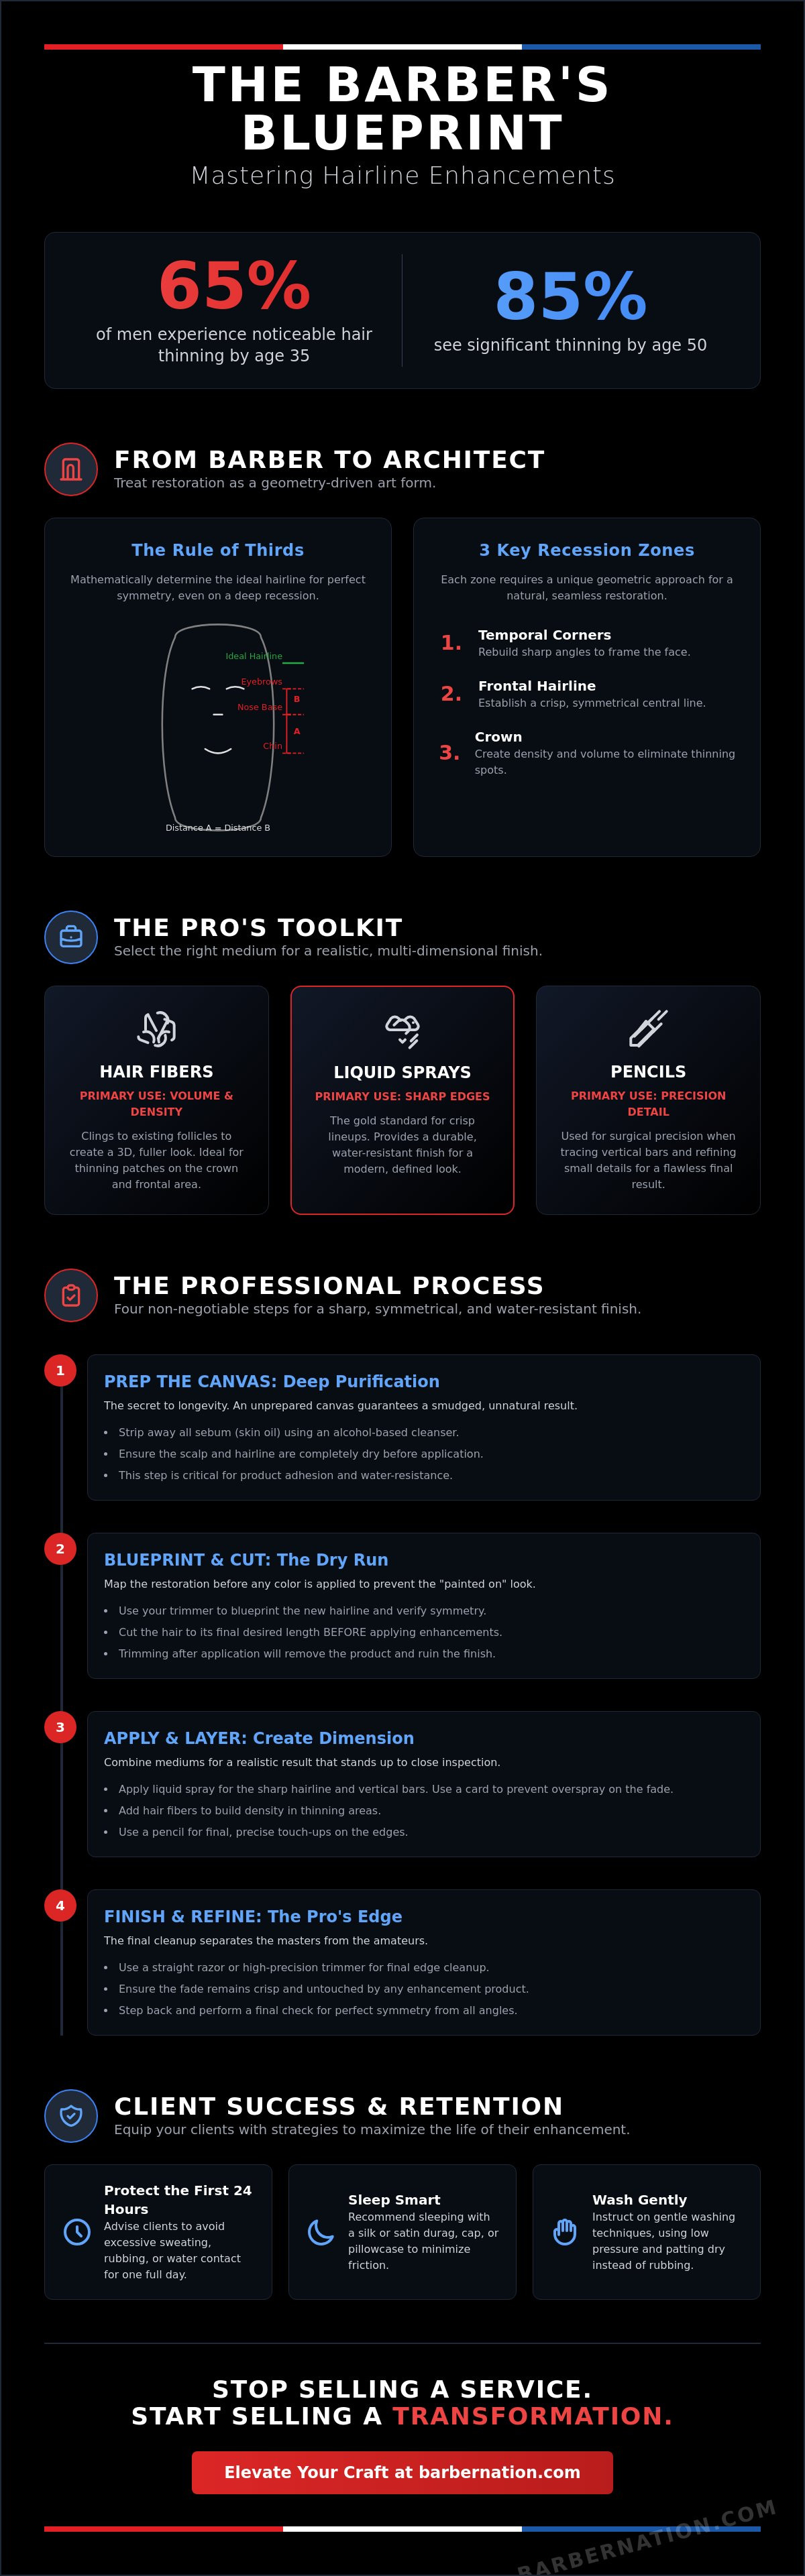
Step-by-Step Guide to Applying Hair Enhancements
Fixing a receding hairline with enhancements is a multi-dimensional process that requires layering different mediums to achieve a lifelike result. While many beginners rely on a single product, the professional standard involves a five-step sequence that combines liquid bases, structural fibers, and precision detailing. While some clients may explore clinical receding hairline treatment options like medications or surgical transplants, your role is to provide the immediate, high-impact aesthetic solution that restores their silhouette today. Follow this rigorous protocol to ensure a result that is both durable and indistinguishable from natural growth.
- Step 1: Blueprinting. Map the new hairline using a professional enhancement card or template. This ensures perfect symmetry and prevents the product from drifting too low on the forehead.
- Step 2: Base Application. Apply a light base layer of water-resistant liquid enhancement using an airbrush. This creates the initial shadow and provides a "tack" for the next layer.
- Step 3: Texturizing. Layer hair fibers directly into the wet liquid base. This adds the 3D depth that prevents the restoration from looking flat or "painted on."
- Step 4: Sealing. Lock the entire construction with a high-hold finishing spray. This step is non-negotiable for ensuring sweat-resistance and all-day longevity.
- Step 5: Detailing. Use an enhancement pencil to refine the vertical bars and highest points of the lineup. This adds the final touch of surgical precision that defines an elite cut.
Mastering the Airbrush Technique
Control is the difference between a master and an amateur. Set your compressor between 15 and 20 PSI to ensure a fine, mist-like delivery. Hold the airbrush approximately four to six inches from the scalp and utilize a "feathering" motion. Start with a light, translucent pass and build opacity slowly; this preserves the natural skin texture underneath. Avoid the "blocked" look by keeping the transition at the very front of the hairline soft and slightly transparent. This gradient effect is what makes fixing a receding hairline with enhancements look authentic rather than artificial.
Integrating Hair Fibers for Texture
Precision placement is vital when building volume. Use a dedicated applicator pump rather than shaking fibers directly from the bottle to avoid clumping and uneven distribution. Color matching is an art form itself; don't assume "Natural Black" is a universal solution. Often, a "Dark Brown" or a custom blend provides a more realistic match for the client's existing hair. Focus your fibers on the "islands" of thinning hair to bridge the gap between the natural follicles and the new enhancement line. This creates a seamless, high-density look that stands up to the most critical inspection.
The Pro’s Edge: Precision Finishing and Cleanup
The final 10% of the service determines 100% of the client's satisfaction. When fixing a receding hairline with enhancements, the cleanup phase is where most professionals fail. Wiping away excess product with a towel or neck brush is a fundamental error; it introduces friction that smudges the sharp edges you just spent time building. This traditional method often embeds dark pigments into the pores of the skin, creating a muddy appearance that ruins the "pop" of the fade. To maintain an elite standard, you must remove debris without ever making physical contact with the set enhancement.
Over-spray is the primary enemy of a high-definition finish. Even with a steady hand, a fine mist of liquid enhancement often settles on the skin surrounding the lineup, which dulls the contrast of a fresh fade. This "ghosting" effect makes the hair look unnaturally heavy and artificial. Mastering the cleanup means clearing this over-spray while the product is still setting. Instead of reaching for a cloth, utilize high-pressure air to clear the field. This ensures that every loose fiber and stray pigment particle is gone, leaving only the structural restoration behind.
Advanced Cleanup with the BarberNation Cordless Air Duster
Precision requires modern tools that respect the delicacy of the art form. The BarberNation Cordless Air Duster is engineered to remove loose fibers and dust without the risk of smudging. By utilizing a technique known as "air-polishing," you can direct a concentrated stream of air along the fade line to lift away debris that would otherwise dull the look. This cordless technology is essential for a high-speed shop environment where mobility and efficiency are paramount. It allows you to clean, refine, and polish the cut in seconds, ensuring your work stands out with clinical clarity.
The Final Razor Finish
Once the enhancement has fully dried, use a straight razor to sharpen the edge for a true HD finish. This step removes any microscopic peach fuzz that the enhancement might have clung to, creating a stark, clean line that defines the entire silhouette. Apply a soothing, alcohol-free aftershave that won't dissolve the enhancement or cause the skin to become overly oily. This final touch seals the service and protects the client's skin. To equip your station with the industry's most powerful finishing tools, browse the full BarberNation Turbojets collection and elevate your craft to the next level.
Ready to deliver the sharpest finishes in the game? Secure your BarberNation Turbojet today and experience the power of professional-grade air cleaning.
Maintenance and Longevity: Client Success Strategies
Your work doesn't end when the client leaves the chair. Fixing a receding hairline with enhancements is an investment in a client's professional image, and protecting that investment requires clear, authoritative guidance. While you've mastered the application, the client must master the preservation. Education is the bridge between a one-time service and a loyal, long-term partnership. You must be transparent about the lifespan of the products used; while temporary fibers may only last 24 to 48 hours, a high-caliber WATER RESISTANT HAIR ENHANCEMENT can maintain its structural integrity for five to seven days when handled with care.
Establish a "re-up" culture within your shop. Encourage clients to book maintenance appointments every 7 to 10 days to ensure their lineup never loses its surgical precision. This frequency keeps the restoration looking fresh and prevents the natural hair growth from blurring the enhancement's edges. Ethical transparency is your greatest tool here. Always explain that while enhancements provide a transformative aesthetic, they're a high-performance grooming tool rather than a permanent medical fix. This honesty builds the trust necessary for elite client retention.
The Client Aftercare Checklist
The first 12 hours are the most critical for product adhesion. Instruct your clients to avoid heavy steam, intense gym sessions, or excessive sweating during this window to allow the sealers to fully cure. When they eventually wash their face or shower, they must adopt specific habits to prevent premature fading. The pat-dry method involves using a soft towel to gently press against the forehead and temple areas rather than rubbing, which preserves the structural integrity of the enhancement. Recommend sulfate-free cleansers for their daily routine, as harsh chemicals in standard soaps can dissolve the pigment and ruin the gradient you worked hard to create.
Positioning Enhancements as a Premium Add-on
Transform your business by framing fixing a receding hairline with enhancements as an elite, specialized service. This isn't a standard haircut; it's hair architecture that requires premium products and advanced technical skill. Price your services to reflect the additional time, equipment, and expertise involved. Utilize high-contrast before-and-after photos on your social media platforms to showcase the dramatic impact of your work. These visuals serve as your digital portfolio, attracting clients who are specifically looking for a specialist in restoration. By focusing on these high-value results, you position yourself at the forefront of the industry, proving that success is a combination of the practitioner's skill and the superior caliber of the equipment they use.
Elevate Your Trade to an Elite Standard
Mastering the geometry of the scalp and the chemistry of skin preparation transforms a standard cut into a high-performance restoration. You've learned how to blueprint with surgical precision, layer for three-dimensional depth, and maintain those results through rigorous client education. Fixing a receding hairline with enhancements is no longer a mystery; it's a calculated, technical process that delivers immediate confidence to the client and long-term prestige to your brand. By treating every service as an elevated art form, you distinguish yourself as a leader in a competitive global market.
True excellence requires a commitment to superior standards and the right equipment. Our professional-grade water-resistant formula is trusted by elite barbers nationwide to withstand the rigors of sweat and daily activity. To ensure your finishes are always crisp and free of dulling debris, you must utilize high-performance cordless technology for precision cleanup. Elevate your finishing game with the BarberNation Cordless Air Duster and witness the immediate evolution of your craft. Your journey toward becoming a master of hair architecture is a continuous progression. Stay ambitious, keep innovating, and continue to push the boundaries of what's possible in your shop every single day.
Frequently Asked Questions
How long do hairline enhancements typically last?
Semi-permanent enhancements typically last between 5 and 7 days when applied to a properly prepared, oil-free canvas. Temporary solutions like hair fibers usually provide structural definition for 24 to 48 hours before needing a touch-up. The total longevity depends on the client’s skin type, local climate, and their strict adherence to aftercare protocols. Regular maintenance appointments help maintain the sharpest silhouette for high-profile clients who demand an elite appearance every day.
Will enhancements run or smudge if my client sweats or gets caught in the rain?
High-performance water-resistant enhancements won't run or smudge under normal conditions like light rain or moderate perspiration. Achieving this level of durability requires a deep alcohol-based cleanse to remove sebum and oils before you begin the application. If the product is sealed correctly with a high-hold finishing spray, the pigments bond securely to the skin and hair follicles. This ensures the restoration remains crisp and professional through the client’s daily activities.
Can I use enhancements on a completely bald spot or just thinning areas?
Enhancements perform best on thinning areas where existing follicles provide a base for fibers to cling to. However, you can use liquid pigments to shadow completely bald spots and rebuild a missing hairline from scratch. Fixing a receding hairline with enhancements on smooth skin requires a lighter, gradient-focused touch to avoid a flat, artificial appearance. Mastery of this technique allows you to create a believable illusion of density even where natural growth is absent.
Do hair enhancements cause further hair loss or damage the scalp?
Professional-grade enhancements are non-invasive and don't cause hair loss or damage the scalp when applied and removed correctly. Most formulas are engineered to sit on the surface of the skin and hair without clogging the follicles or irritating the dermis. It's essential to use high-quality products and advise clients to avoid aggressive scrubbing. This preserves both the aesthetic enhancement and the long-term health of the underlying scalp environment.
How do I choose the right color enhancement for my client?
Select a color that matches the darkest part of the client’s natural hair, typically found at the back or sides of the head. Don't rely solely on jet black; often, dark brown or a custom blend creates a more realistic and seamless transition. Observe the client's hair in natural light to identify specific undertones before application. A perfect color match ensures the restoration looks like an elevated art form rather than a temporary mask.
Can my client wash their hair after an enhancement service?
Clients should avoid washing their hair for at least 12 hours after the service to allow the bonds to fully cure and set. After this critical window, they can use sulfate-free cleansers and the "pat-dry" method to maintain the look without stripping the pigment. Fixing a receding hairline with enhancements requires this initial dry period to ensure the products don't dissipate. This discipline ensures the service value remains high and the lines stay sharp for the entire week.
What is the best way to remove enhancements at the end of their lifespan?
Removal is straightforward and requires nothing more than a standard shampoo or a mild alcohol-based cleanser to break down the bonds. Clients should gently massage the area with their fingertips to lift the pigments and fibers before rinsing with warm water. For professionals, using a warm towel can help soften the product for a clean slate during a fresh service. This process ensures the scalp is perfectly prepared for the next architectural restoration.
Is it necessary to have an airbrush machine for hairline enhancements?
While you can use pencils or pump sprays for minor touch-ups, an airbrush machine is the gold standard for achieving a professional, gradient finish. It allows for superior control over opacity and pressure, which is necessary for the advanced "feathering" technique. Utilizing an airbrush elevates the service from a simple touch-up to a high-end architectural restoration. It provides the surgical precision and durability that elite clients expect from a seasoned industry veteran.
Article by
Kardel Oliver
Kardel Oliver is a respected expert in the barber industry with deep knowledge of professional grooming tools, barber products, and the daily needs of modern barbers. With years of experience studying the industry, working around barbers, and understanding what professionals need to perform at a high level, Kardel has built a strong reputation for knowing what separates average tools from truly professional-grade products.
Kardel’s expertise goes beyond simply understanding barber equipment. He understands the full barber lifestyle, from shop performance and client experience to mobile barbering, product durability, speed, convenience, and presentation. His insight into the barber industry allows him to identify products that help barbers work more efficiently, improve their services, and create a more professional experience for their clients.
Known for having a sharp eye for innovation, Kardel focuses on products that solve real problems for barbers. Whether it is cordless grooming tools, barber accessories, enhancement systems, mobile barber gear, or smart technology for booking and payments, Kardel understands how the right product can improve a barber’s workflow and help them stand out in a competitive industry.
Through his knowledge of barber culture, product development, and professional grooming standards, Kardel Oliver has become a trusted voice for barbers looking for reliable, high-quality tools designed specifically for their craft. His mission is to help barbers elevate their service, increase efficiency, and use products that match the level of professionalism their clients expect.