
Your skill as a barber isn't measured by how many clients you sit, but by the surgical precision of the transition you leave behind. A blurry blend is the silent killer of a professional reputation, yet many practitioners struggle with muddy gradients and inconsistent guidelines that lose their edge the moment the client leaves the chair. Learning how to make a fade look sharper is the definitive bridge between performing a routine service and mastering an elevated art form. You deserve to produce work that commands respect, justifies premium pricing, and secures absolute client loyalty.
This guide empowers you to master the advanced blending, enhancement, and cleanup techniques that transform a standard haircut into a high-definition professional fade. We will detail how to maintain a pristine canvas using the BarberNation Cordless Air Duster, how to apply WATER RESISTANT HAIR ENHANCEMENT for lasting impact, and how to leverage 2026 tool innovations like the MyBlades Tensor 1 AI-powered clipper. By the end of this article, you will have a clear blueprint to increase your service speed, enhance your technical prestige, and deliver the high-contrast results your career trajectory demands. Elevate your craft and define your legacy with every cut.
Key Takeaways
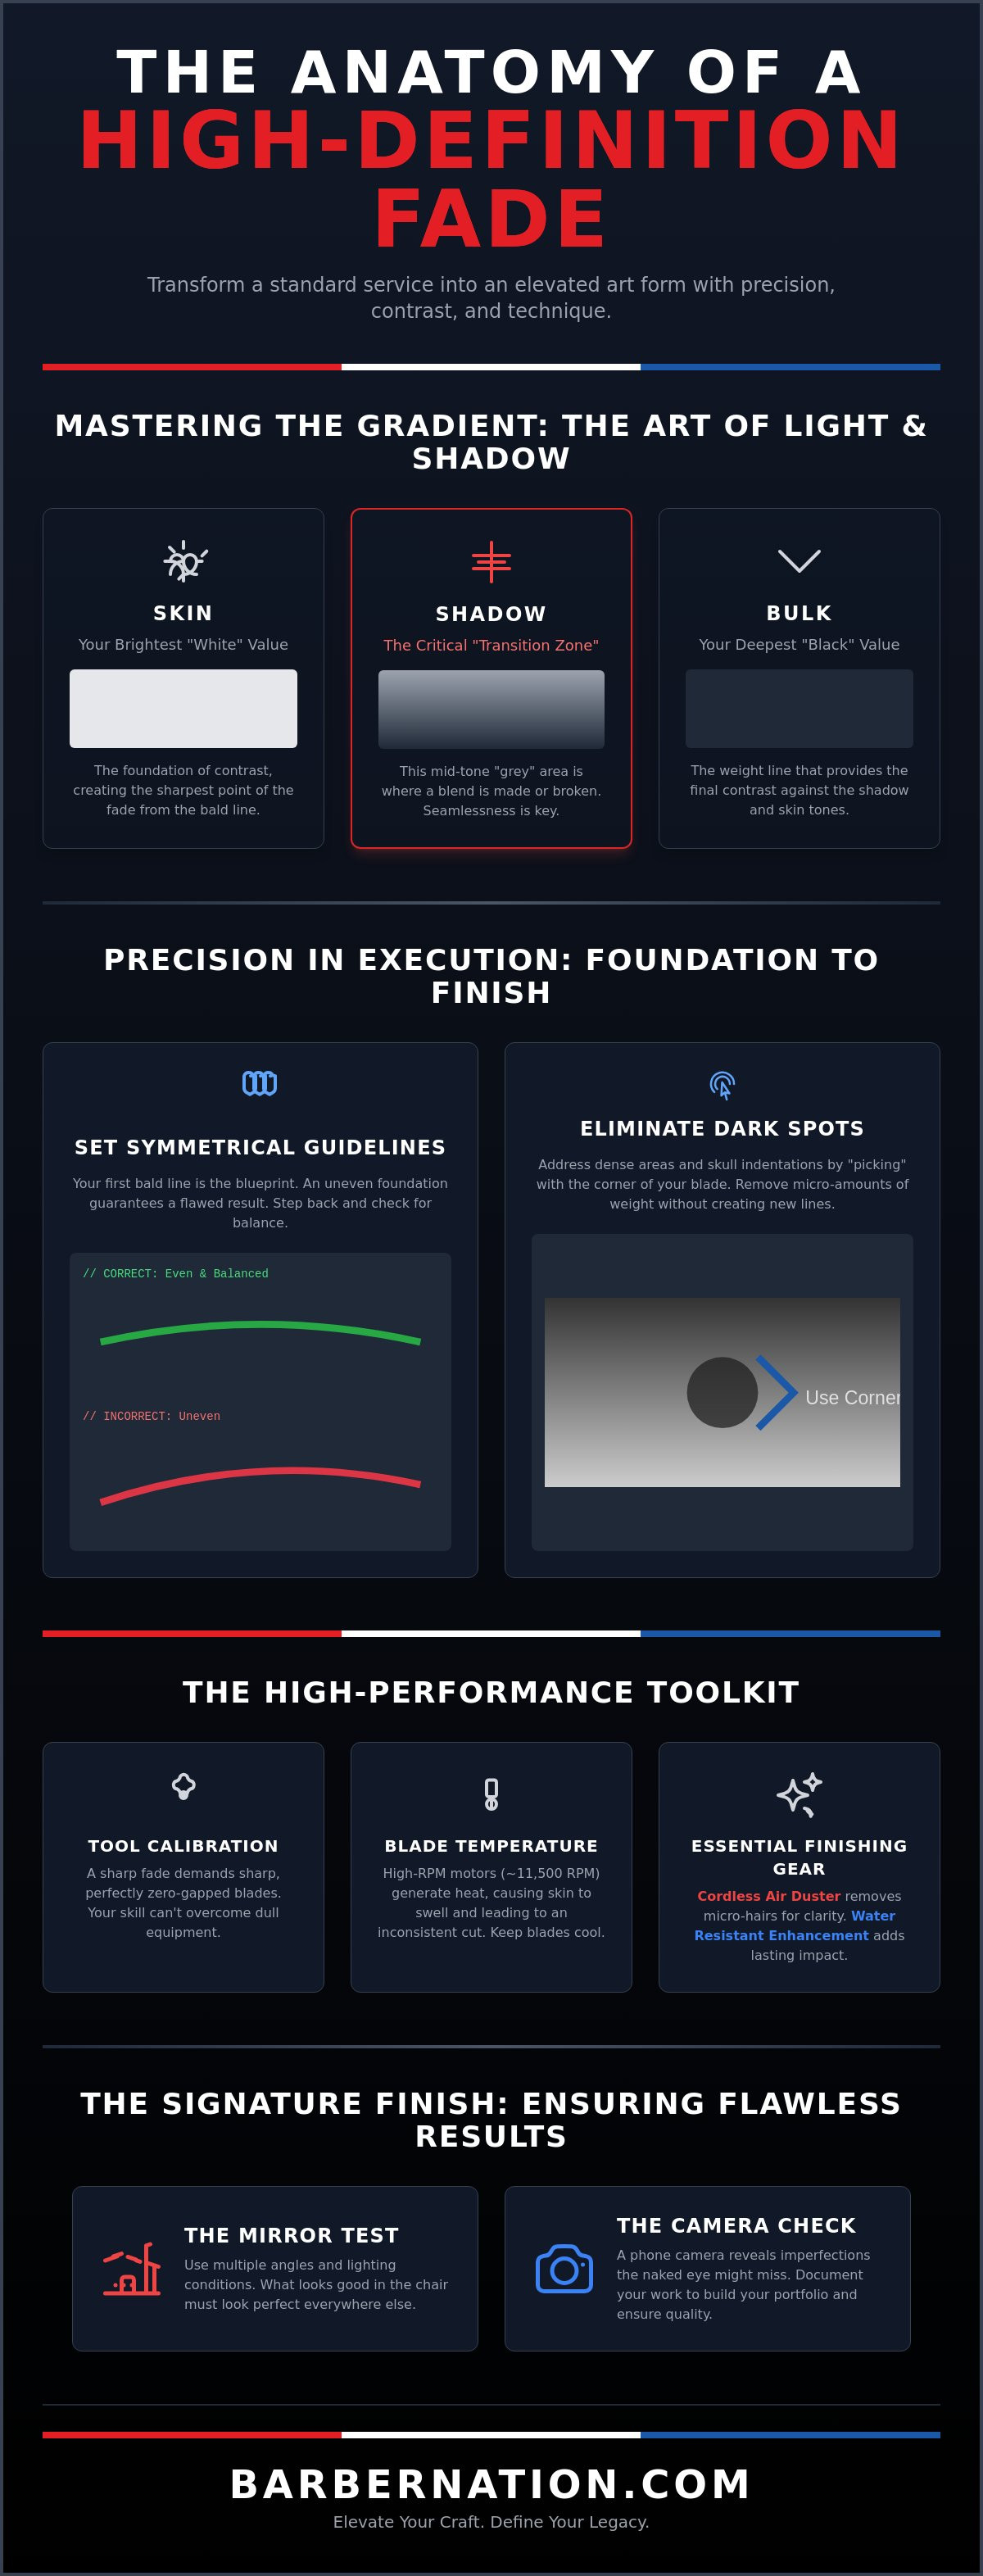
- Master the manipulation of light and dark values within the Transition Zone to create high-contrast gradients that command attention.
- Discover the technical secrets of how to make a fade look sharper through precise zero-gapping and seamless skin-to-hair transitions.
- Elevate your artistry by integrating WATER RESISTANT HAIR ENHANCEMENT as a sophisticated finishing service rather than a simple cover-up.
- Eliminate visual muddiness and achieve high-definition clarity by clearing micro-hairs with the BarberNation Cordless Air Duster.
- Implement rigorous final inspection techniques, including the mirror test and camera check, to ensure your work maintains its elite status.
Mastering the Gradient: Why Contrast is the Key to Sharpness
Precision is the hallmark of an elite practitioner. A truly sharp fade is an intentional manipulation of light and dark values, creating a visual gradient that flows seamlessly from the scalp to the hair's full density. When you understand that you aren't just cutting hair but managing light, you begin to see the Fade (hairstyle) as a sophisticated art form. The most critical area of any cut is the Transition Zone. This is the narrow space where the most visual impact occurs, bridging the gap between the skin and the weight line. To understand how to make a fade look sharper, you must master the three distinct levels of contrast: Skin, which represents your brightest "white" value; Shadow, your mid-tone "grey" transition; and Bulk, your deepest "black" value.
Lighting plays a decisive role in your ability to execute these transitions. Many shops utilize harsh, overhead LED panels that can wash out the subtle details of a blend or hide inconsistencies. Successful masters often use secondary lighting or position their chairs to catch side-angles, ensuring every hair is accounted for. If you cannot see the gradient clearly in your station, your client will certainly notice the flaws once they step into natural sunlight. Consistency in your environment leads to consistency in your results.
To better understand this concept, watch this helpful video:
The Science of Visual Weight
Identifying dark spots is the difference between a muddy blend and a high-definition finish. These spots occur where hair grows more densely or where the skull has natural indentations. You must use the corner of your clipper blade to "pick" at these specific areas. This technique allows you to remove micro-amounts of weight without creating new, harsh guidelines. Remember that every head shape is unique. Dips in the bone structure create natural shadows that you must compensate for by cutting slightly shorter in those specific zones to maintain a uniform color throughout the gradient.
Setting Guidelines with Purpose
Your first bald line is the foundation of the entire service. If this line is uneven or lacks symmetry, the rest of the fade will inevitably follow that flawed path. Take the time to step back and check the balance across both sides of the head before moving to your next guard. You must choose the height of your fade with intention. A low fade offers a conservative, heavy look, while a high fade maximizes contrast by pushing the "white" value further up the head. Proper guideline spacing ensures that each level of the gradient has enough room to breathe, preventing the blend from looking compressed or blurry.
Precision Tool Calibration: Elevating Your Execution
Your technical proficiency is limited by the calibration of your equipment. Even the most seasoned professional cannot overcome a dull blade or a misaligned motor. Mastering how to make a fade look sharper requires more than just a steady hand; it demands a deep understanding of mechanical precision. While industry experts often debate which models qualify as the best hair clippers, the true differentiator is how you maintain and tune those tools for elite performance. A perfectly calibrated machine allows you to focus on the art rather than fighting the hardware.
Blade temperature is a frequently overlooked variable in the pursuit of a flawless finish. Modern high-performance motors, such as the 11,500 RPM found in the StyleCraft Instinct, provide incredible torque but generate significant heat through friction. When blades become too hot, they cause the client's skin to swell slightly. This minor inflammation changes the hair's exit angle from the follicle, leading to an inconsistent gradient once the skin cools. Professionals must monitor tool temperature and utilize cooling sprays or air to keep the cutting surface optimal. Maintaining a cool blade is a fundamental step in learning how to make a fade look sharper over the course of a full service.
Zero-Gapping and Blade Alignment
Zero-gapping is the process of aligning the moving blade as close to the stationary blade's edge as possible. This modification allows for laser-sharp lineups and effortless removal of the bulk line. To perform a safety check, always hold the clipper horizontally and look across the blade profile. The moving blade must never overhang the fixed blade, as this will bite the client's skin. A perfectly aligned blade reduces the need for multiple passes, which minimizes skin trauma and accelerates your service time. Understand the difference between a flat fade blade for precision and a curved taper blade for scooping motions to ensure you're using the right tool for the specific transition.
Foil Shaver Mastery
The foil shaver is your primary tool for achieving the brightest white value in a high-contrast fade. Transition from your trimmer to the shaver approximately one finger-width below your initial bald line. To avoid creating a hard line that is difficult to blend out, use a light flicking motion as you approach the transition point. Always shave against the grain for maximum smoothness, but be prepared to adjust your direction based on the client's unique growth patterns. Keeping your foils clear of debris with a high-velocity air duster ensures the blades cut cleanly without pulling or snagging. This level of cleanliness preserves the integrity of your tools and the comfort of your client.
Strategic Enhancements: Elevating the Visual Impact
High-definition results require more than just mechanical precision. Enhancements are often misunderstood by those outside the elite circle of the trade; they aren't a mask for poor technique but a strategic tool used to amplify the natural architecture of a haircut. When you focus on how to make a fade look sharper, you must view enhancements as the professional finish that brings your technical work to life. This service provides the crisp, saturated look that clients demand for high-profile events and social media presence. By mastering this phase, you position yourself as a premium artist who understands the nuances of visual weight.
Effective application begins with a solid foundation in traditional cutting. Before reaching for any pigment, ensure your gradient is already structurally sound by following a step-by-step barbering tutorial that emphasizes clean guidelines and proper tool handling. Once the cut is technically accurate, choose your medium based on the specific needs of the canvas. Hair fibers are ideal for adding visual density to thinning areas or crown sections. Liquid sprays, however, are the definitive choice for defining the hairline and beard edges with absolute clarity.
Applying Water-Resistant Solutions
Durability is the primary concern for clients who want their sharp look to last beyond the first shower. Utilize WATER RESISTANT HAIR ENHANCEMENT to ensure the finish survives daily activity and humidity. Use a compressor or a dedicated spray card to isolate the hairline, focusing specifically on the C-cup and vertical bars. These areas provide the most visual impact against the skin. Apply the solution in light, overlapping layers rather than a single heavy coat to avoid a blocky, artificial appearance. A seamless transition between the pigment and the natural hair is the hallmark of a seasoned professional.
The Enhancement Pencil Technique
The enhancement pencil serves as a high-contrast highlighter for your lineup. Apply a light-colored pencil just outside the hairline to accentuate the crispness of the edge. You must smudge the line slightly with a small brush to create a "glow" effect that draws the eye to the precision of the cut. This technique is particularly effective for photography, as it separates the hair from the skin with surgical clarity. Lock the entire look in place with a light holding spray to ensure longevity. Position these enhancements as a premium add-on to increase your revenue and client retention. Clients who see themselves in high-definition don't go back to standard services.
The Clean Slate Method: Removing Debris for High Definition
A flawless gradient is often obscured by the very process of creating it. As you work through your guidelines, thousands of micro-hairs accumulate on the scalp and within the teeth of your blades. These tiny clippings create a false sense of a muddy blend, making it nearly impossible to distinguish between a technical error and simple debris. To understand how to make a fade look sharper, you must prioritize a clean canvas at every stage of the service. Relying on outdated neck dusters or repetitive brushing is no longer sufficient for the modern high-definition standard.
Traditional brushes often harbor bacteria and fail to remove the finest hair particles that cling to the skin's natural oils. By switching to high-pressure air, you eliminate the "brush, cut, brush" cycle that slows down your service time. Constant cleanup allows you to see the true gradient as it develops, ensuring that every adjustment you make is based on the hair's actual density rather than surface-level clutter. This level of station management projects an image of elite professionalism and technical superiority that clients immediately recognize.
The Power of the Cordless Air Duster
The introduction of specialized airflow tools has revolutionized the finishing process. The BarberNation TurboJet FadeBlaster is a game-changer for visibility, providing a concentrated stream of air that clears the scalp without irritating the client. Unlike a brush, which can cause redness on sensitive skin after multiple passes, air removes debris with zero physical contact. You can clear your clipper blades and the client's skin simultaneously, ensuring your tools remain at peak efficiency throughout the cut. This integration of technology into your workflow is a core component of how to make a fade look sharper and more professional.
Visibility and Precision
A debris-free canvas reveals the small inconsistencies that separate a standard haircut from an elite service. When the scalp is clear, you can identify the exact "dark spots" that require corner-work or detail-picking. This precision reduces the likelihood of over-fading or creating holes in the blend. Explore the full range of BarberNation TurboJets to find the right configuration for your station. Elevate your efficiency and clear the path to a perfect finish today. Equip your station with the TurboJet FadeBlaster for surgical clarity in every transition.
The Signature Finish: Longevity and Client Education
The culmination of your technical labor deserves a presentation that matches its caliber. The final moments in the chair determine whether a client views the service as routine maintenance or an elite transformation. Mastering how to make a fade look sharper involves a rigorous final inspection that moves beyond the naked eye. Perform the Mirror Test by viewing the blend from multiple angles to catch light-refraction errors. Follow this with a Phone Camera check. Lenses often reveal subtle, muddy inconsistencies that human vision overlooks. The camera doesn't lie. This dual-verification process ensures your work is ready for the scrutiny of high-definition social media and real-world lighting.
The "Cape Flip" serves as the definitive signature of a master. It's a purposeful, rhythmic movement that signals the completion of the art form. This ritual builds anticipation and frames the reveal as a moment of prestige. During this transition, apply a premium aftershave or tonic to soothe the skin and provide a sophisticated scent. This attention to detail reinforces the high standards of your station and elevates the client's sensory experience. You aren't just cutting hair; you're providing a luxury experience that justifies professional pricing.
Post-Cut Skin Care
Professional skin management is essential for a polished finish. Use cold towels or astringents to close the pores immediately after the lineup. This prevents redness and provides a clean, matte appearance that makes the hairline pop. Apply talc-free powders to remove any remaining moisture or micro-hairs that could blur the crispness of the edges. To finalize the visual weight, apply a light pomade or sheen to the hair's bulk. This technique makes the dark values stand out against the bright skin transition, emphasizing the high-contrast gradient you worked so hard to achieve.
Building the Professional Brand
Your career is a continuous progression that relies on social proof and client retention. Take high-quality photos of every sharp finish to document your growth and attract a specialized global community of followers. These images serve as your digital resume, proving you understand how to make a fade look sharper than the competition. Educate your client on the shelf-life of their cut. Explain that a high-definition fade typically maintains its peak sharpness for seven to ten days. Use this opportunity to secure a pre-booking, positioning yourself as a high-demand master whose time is a valuable commodity. This proactive approach secures your revenue and guarantees the client never loses their professional edge. Elevate the craft, master the tool, and define the standard.
Define Your Legacy Through Technical Precision
The pursuit of technical excellence is a continuous progression that separates the routine service provider from the industry master. By implementing the science of visual contrast, calibrating your tools for surgical accuracy, and maintaining a debris-free canvas, you now hold the definitive blueprint for elite results. Mastering how to make a fade look sharper is not a single action; it is a relentless commitment to high-definition standards at every stage of the haircut. You possess the knowledge to transform every chair session into a statement of professional growth and technical superiority.
Your success depends on the synergy between your refined skill and the superior caliber of your equipment. Elevate your craft with professional-grade BarberNation equipment and join the elite professionals nationwide who rely on our innovative cordless technology for maximum shop efficiency. Utilize our water-resistant enhancement solutions to deliver the high-contrast, long-lasting results that your high-prestige clientele demands. Take pride in your trade and continue to push the boundaries of your artistry. The next level of your career begins with the very next cut you perform. Master the skill, own the gear, and lead the trade.
Frequently Asked Questions
Why does my fade look blurry after a few hours?
Fades often appear blurry due to minor skin inflammation or micro-debris settling into the scalp. High-speed clipper blades generate friction heat that causes the skin to swell slightly, which temporarily alters the hair's exit angle. Once the skin cools and the inflammation subsides, the gradient shifts and reveals inconsistencies. Maintain cool blade temperatures and clear the scalp with high-pressure air to ensure your visual assessment remains accurate throughout the service.
Is using hair enhancement considered 'cheating' in professional barbering?
Strategic enhancements are a professional finishing service rather than a deceptive cover-up for poor technique. Elite practitioners use WATER RESISTANT HAIR ENHANCEMENT to amplify the natural architecture of a technically sound cut. This service adds visual density and defines the hairline with high-definition clarity. It is a premium add-on that satisfies the modern client's desire for a social-media-ready finish that lasts through daily activity and humidity.
How often should I zero-gap my clippers for the sharpest results?
You should inspect your blade alignment daily and perform a full zero-gap calibration whenever you replace or deep-clean your blades. Moving parts can shift slightly during high-volume shop days, which compromises your precision and can lead to skin nicks. Maintaining a perfectly aligned edge is a fundamental requirement for anyone learning how to make a fade look sharper. Consistent calibration ensures your tools perform with surgical accuracy on every client.
What is the best way to remove fine hair clippings from a fresh fade?
Utilizing a high-velocity stream of air is the most effective method for maintaining a pristine canvas. Traditional neck dusters and brushes often harbor bacteria and cause skin irritation through repetitive physical friction. The BarberNation Cordless Air Duster removes micro-hairs from the scalp and clipper teeth simultaneously without touching the skin. This touchless cleanup reveals the true gradient and allows you to identify dark spots with absolute clarity.
Can I achieve a sharp fade on all hair types and textures?
Sharp results are achievable on every texture, though the technical approach must adapt to the hair's unique density and growth pattern. Straight hair often requires more "picking" with the clipper corner to remove weight without creating holes. Coarse or curly textures demand precise management of the "dark" values to prevent a patchy appearance. Understanding how light interacts with different hair patterns is the key to creating high-contrast transitions on any canvas.
How do I prevent the 'hard line' when using a foil shaver?
Prevent harsh lines by stopping your shaver approximately one finger-width below your initial trimmer guideline. Use a light, flicking motion as you approach the transition zone to soften the impact of the shaver head. Shaving against the grain provides maximum smoothness, but you must ease the pressure as you move upward toward the blend. This technique ensures a seamless skin-to-hair transition that pops without requiring excessive corrective blending later.
Does the lighting in my shop really affect how sharp the fade looks?
Lighting is the most influential external factor in your perception of a gradient. Harsh, overhead LED panels often wash out the mid-tones of a blend, making a technically perfect fade look inconsistent or muddy. Position your chair to utilize side-lighting or secondary lamps that reveal the hair's true visual weight and density. Controlling your light environment is a professional secret for those who want to know how to make a fade look sharper in any station.

Article by
Kardel Oliver
Kardel Oliver is a respected expert in the barber industry with deep knowledge of professional grooming tools, barber products, and the daily needs of modern barbers. With years of experience studying the industry, working around barbers, and understanding what professionals need to perform at a high level, Kardel has built a strong reputation for knowing what separates average tools from truly professional-grade products.
Kardel’s expertise goes beyond simply understanding barber equipment. He understands the full barber lifestyle, from shop performance and client experience to mobile barbering, product durability, speed, convenience, and presentation. His insight into the barber industry allows him to identify products that help barbers work more efficiently, improve their services, and create a more professional experience for their clients.
Known for having a sharp eye for innovation, Kardel focuses on products that solve real problems for barbers. Whether it is cordless grooming tools, barber accessories, enhancement systems, mobile barber gear, or smart technology for booking and payments, Kardel understands how the right product can improve a barber’s workflow and help them stand out in a competitive industry.
Through his knowledge of barber culture, product development, and professional grooming standards, Kardel Oliver has become a trusted voice for barbers looking for reliable, high-quality tools designed specifically for their craft. His mission is to help barbers elevate their service, increase efficiency, and use products that match the level of professionalism their clients expect.