

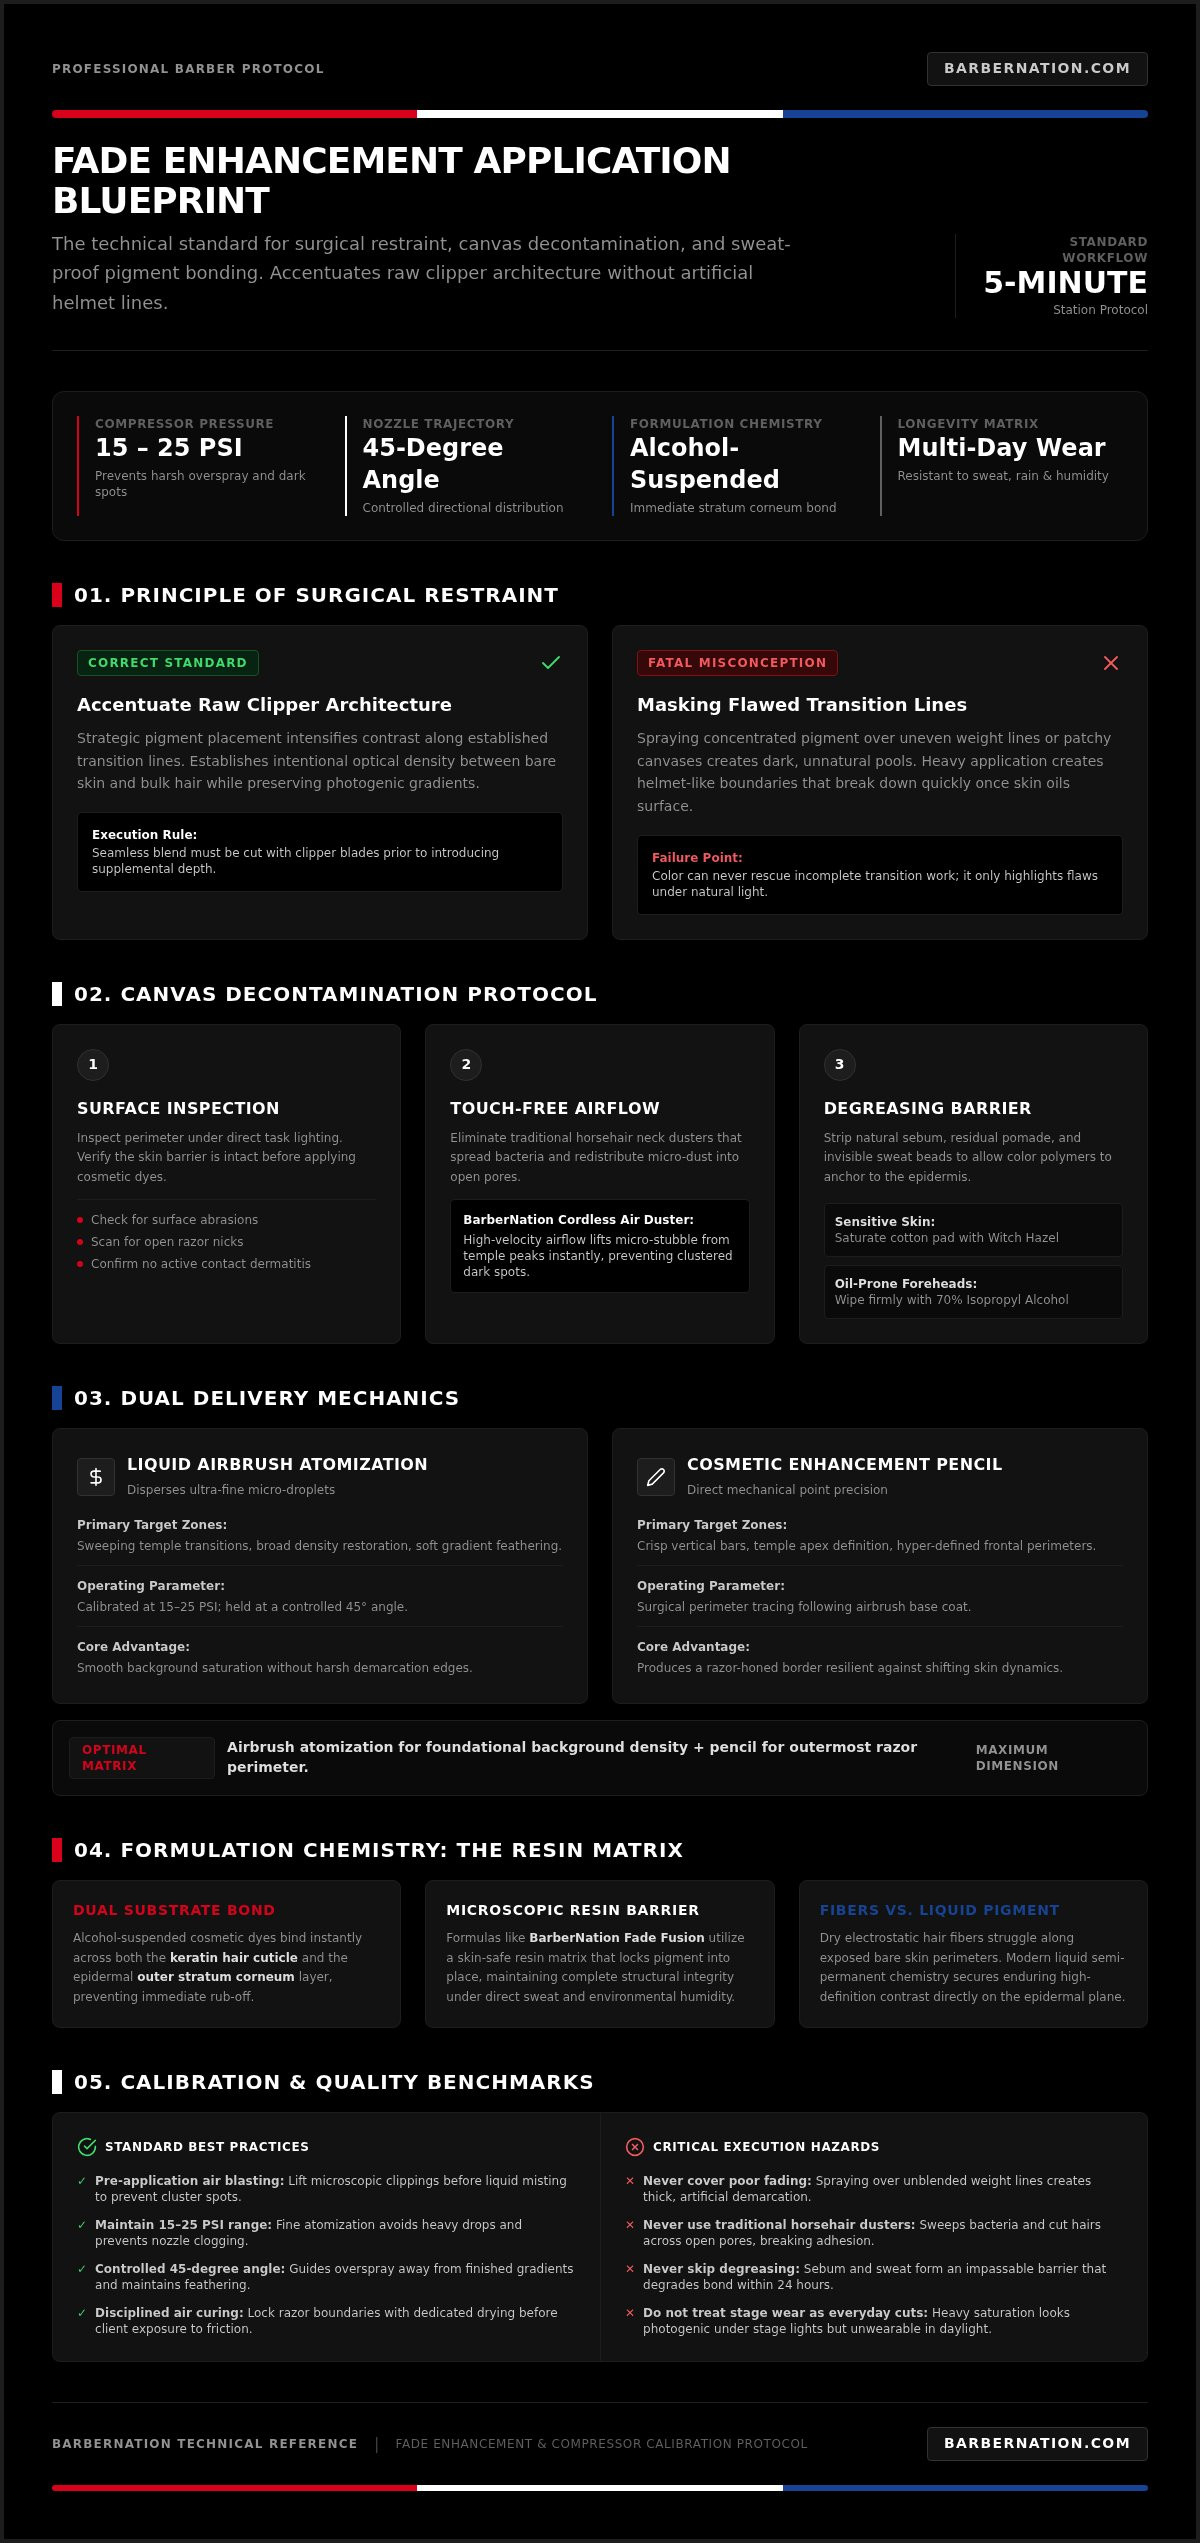
Elite fade enhancement is never about hiding poor clipper work under thick paint; true mastery is an exercise in surgical restraint. When executed with precision, a professional fade enhancement application builds subtle pigment density that accentuates raw fade architecture without producing an unnatural, helmet-like boundary.
Every serious barber knows the dread of watching a crisp edge bleed the moment a client steps into humidity, or fighting clogged airbrush nozzles that derail a tight appointment schedule. Dark spots, harsh overspray, and heavy lines don't just muddy a clean gradient; they alienate clients who demand subtle, photogenic refinement.
Mastering this service requires combining disciplined station prep with resilient, sweat-proof application chemistry. In this guide, you will learn the exact compressor calibrations, touch-free prep steps, and blending protocols needed to deliver durable, water-resistant wear in a streamlined five-minute workflow. Here is your definitive blueprint for executing clean lines, dense temple peaks, and enduring client loyalty.
Key Takeaways
- Calibrate your fade enhancement application to accentuate raw clipper architecture rather than masking incomplete transition work.
- Decontaminate the skin canvas by eliminating sebum, oils, and microscopic hair debris to maximize pigment bond strength.
- Dial your airbrush compressor between 15 and 25 PSI at a controlled 45-degree angle to prevent harsh overspray and dark spots.
- Differentiate between high-contrast stage work and wearable everyday styling to maintain a natural, photogenic gradient.
- Lock in razor-sharp boundaries with disciplined air-curing protocols and moisture-resistant sealing techniques built for multi-day wear.
What Is Fade Enhancement Application in Modern Barbering?
A common misconception across the trade suggests that color applications exist to conceal poor clipper blending. That mindset leads directly to heavy, artificial finishes. Premium enhancements accentuate structural cutting; they never rescue uneven weight lines. Spraying concentrated pigment over a patchy canvas only produces dark, unnatural pools that break down quickly once skin oils surface. True craftsmanship requires establishing a seamless blend with your tools before introducing any supplemental depth.
Barbers historically relied on dry, charged hair fibers locked down with aerosol sprays. While effective for localized top thinning, dry fibers struggle against friction, sweat, and moisture along exposed skin perimeters. Modern liquid chemistry changes that reality. Today's service leans heavily on cosmetic solutions adapted from foundational semi-permanent hair coloring techniques to achieve enduring, high-definition contrast directly on the epidermal layer.
The Core Science Behind Enhancement Formulations
Professional liquid airbrush color relies on specialized carrier agents to deliver uniform pigment deposition. Alcohol-suspended cosmetic dyes bind instantly across both the keratin cuticle and the outer stratum corneum, creating a resilient film that resists immediate rub-off. Advanced formulas like BARBERNATION FADE FUSION water-resistant hair enhancement maximize this interaction, maintaining complete structural integrity even under direct sweat, rain, and heavy environmental humidity. A microscopic, skin-safe resin matrix anchors the pigment particles across the surface to lock crisp boundaries into place for days.
Liquid Airbrush Sprays vs. Cosmetic Enhancement Pencils
Choosing the correct delivery mechanism depends entirely on the anatomical zone you're detailing. Airbrush atomization disperses ultra-fine micro-droplets, making it the superior tool for sweeping temple transitions, broad density restoration, and soft gradient feathering. In contrast, cosmetic enhancement pencils provide direct mechanical precision for crisp vertical bars and hyper-defined frontal perimeters. Pairing both techniques delivers maximum dimension: lay down an atomized foundation with your airbrush to establish background density, then sharpen the outermost perimeter with surgical pencil work to produce a durable, razor-honed border.
Pre-Application Protocol: Preparing the Canvas for Maximum Adhesion
Premature fading, running pigment, and patchy adhesion rarely stem from the airbrush itself; they originate from poor skin preparation. Natural sebum, residual styling pomade, and invisible beads of sweat act as chemical barriers that block color polymers from bonding to the epidermis. When microscopic hair clippings linger on the temple or hairline, they intercept atomized droplets, creating clustered dark spots and an uneven gradient that washes away within twenty-four hours.
Executing an elite fade enhancement application requires treating the skin like a master canvas. Begin with a thorough surface inspection under direct task lighting. Check the hairline for abrasions, open razor nicks, or active contact dermatitis. Complying with professional sanitation standards and FDA guidelines on hair dye safety protects your clients and shields your business from liability. If the skin barrier is intact, you can proceed with confidence.
Clearing Micro-Debris with Touchless Airflow
Old-school neck dusters are a liability in a modern shop. Traditional horsehair brushes sweep cut clippings across freshly opened pores, spreading bacteria and redistributing dust onto your clean lines. Integrating the BarberNation Cordless Air Duster eliminates friction entirely. High-velocity, touch-free airflow lifts fine stubble from the temple peaks and neckline instantly, exposing the raw transition work so you can evaluate true line density before misting.
Degreasing and Creating an Anti-Humidity Barrier
Once debris is cleared, strip away surface oils to ensure maximum bond strength. Saturate a clean cotton pad with witch hazel for sensitive skin or 70% isopropyl alcohol for oil-prone foreheads, then wipe firmly across the perimeter perimeters. Never spray liquid color onto damp skin. Utilize the focused output of the Turbojet collection to accelerate flash evaporation, transforming the hairline into a bone-dry, humidity-resistant surface ready for uniform pigment lock.
Step-by-Step Fade Enhancement Application Technique
Precision execution separates true artisans from rushed operators. A flawless fade enhancement application relies on mechanical discipline, exact tool angles, and strict geometric alignment. Before applying color to the skin, step back to verify hairline symmetry across three perspectives: direct eye contact, side profile alignment, and your station mirror reflection. The mirror provides objective feedback, instantly exposing tilted frontal baselines or uneven temple points.
Calibrating the Airbrush Compressor and Flow Rate
Calibrate your compressor operating pressure between 15 and 25 PSI. Running below 15 PSI results in poor atomization and heavy, spattering droplets; running above 25 PSI blasts pigment underneath your template, creating uncontrollable overspray rings. Test your spray density on a white paper strip before targeting the client. Master the dual-action trigger control with steady discipline: press down for continuous air delivery, then draw back fractionally to release an ultra-fine, uniform mist.
Mastering Enhancement Card Placement and Angles
Pressing an enhancement template flat against the forehead is a catastrophic error. When a card sits completely flush, liquid pigment pools along the plastic lip and leaves a thick, bleeding puddle the second you lift the stencil away. Instead, position your tool with deliberate restraint:
- Angle the airbrush nozzle at 45 degrees, maintaining a consistent working distance of two to three inches from the scalp.
- Tilt the template edge slightly off the skin to produce a soft, natural drop-shadow along the margin.
- Direct eighty percent of the spray cone into the bulk hair, allowing only twenty percent of the feathered edge to graze the hairline.
Building Dimension on Temple Peaks and C-Cups
Always build density from within the existing hair silhouette rather than spraying outward from bare skin. Anchor your spray passes inside the internal hair pocket behind the temple peak, reinforcing areas where natural density already lives. Once you establish that foundation, feather outward along the vertical bars and C-cups using micro-pulses of the trigger. Layer two to three translucent coats rather than applying a single heavy blast. This patient, buildable approach delivers photogenic contrast that complements your clipper work without looking artificial.
Preserving the Gradient: How to Enhance Without Over-Saturating
The visual failure point of any enhancement service occurs when pigment replaces clipper work rather than framing it. High-contrast, pitch-black lines might look striking under aggressive ring lights on social media, but they rarely translate into real-world confidence. In day-to-day lighting, heavy paint looks chalky, artificial, and immediately alienates professional clients who expect a clean, wearable finish.
Restraint defines the modern master. A disciplined fade enhancement application respects negative space by protecting the skin-to-stubble transition zone. If your overspray drifts into the lowest tier of a skin fade, the organic progression from raw epidermis to bulk weight collapses into a muddy, monochromatic block. You must retain authentic scalp transparency throughout the lower taper to preserve the three-dimensional depth of your cut.
Balancing High-Definition Contrast with Natural Transparency
Evaluate your client's hair caliber, porosity, and natural tone before loading your airbrush. Avoid defaulting to jet black pigment on medium brown or blonde profiles; reach for deep brown or charcoal tones that harmonize with the client's underlying complexion. Leave the lowest half-inch of your skin fade entirely bare, ensuring zero atomized mist settles into the shaved perimeter. True gradient balance occurs when enhanced edges appear crisp and dense while the underlying fade transitions seamlessly from skin to weight with total visual transparency.
Corrective Detailing with Foil Shavers and Pencils
Corrective cleanup transforms an ordinary cut into elite station work. Once your airbrush pass cures, refine your negative space using surgical detailing tools to re-establish pristine skin boundaries:
- Re-strike the perimeter line using zero-gapped trimmers, cutting away any microscopic overspray that drifted beyond your intended boundary.
- Clear loose dust and verify that no wet pigment shifts into open pores by running a high-velocity air stream from the Turbojet collection across the fade plane.
- Glide a hypoallergenic foil shaver across the clean skin zone immediately beneath your perimeter to restore blinding contrast.
- Trace a flesh-toned cosmetic pencil along the exterior margin of the hairline, blending it downward with a fine-bristle detailer brush to create a razor-honed highlight.
Elevate your service standard and deliver immaculate client finishes by exploring professional gear at barbernation.com.
Post-Application Curing, Sealing, and Client Aftercare
A flawless fade enhancement application remains incomplete until the liquid matrix fully polymerizes. Touching, brushing, or combing through the hairline immediately after misting disrupts wet pigment particles before they set, creating smudged borders and uneven patches. Giving the formulation adequate dwell time ensures the microscopic resin film bonds firmly to both the epidermal canvas and the cuticular sheath.
Speeding up chemical curing without disturbing hair orientation demands controlled, non-contact airflow. Rather than fanning the client with a neck strip or waiting idly between chair steps, direct targeted air across the perimeter. A high-efficiency airflow stream accelerates alcohol flash-off within seconds. This rapid dehydration locks the pigment foundation securely in place, allowing you to proceed with final grooming passes without dragging or smudging your edge work.
Locking the Bond with Setting Solutions
Shielding your enhancement against ambient moisture, rain, and midday sebum requires a protective topical barrier. Apply a specialized holding sealant formulated specifically for cosmetic color retention:
- Hold your setting mist six to eight inches away to distribute an ultra-fine, even envelope across the hairline.
- Choose matte-finish sealants to eliminate unnatural gloss that betrays the presence of cosmetic enhancement.
- Dry the protective shield with short bursts from your air tool to prevent droplet pooling along the skin margin.
Educating Clients on Durability and Maintenance
Client education protects your professional reputation. While advanced water-resistant hair enhancement formulas withstand moderate sweat and daily wear, improper home maintenance quickly compromises their structural longevity. Instruct your clients clearly before they step out of the chair:
First, mandate a strict "pat-dry" rule after workouts or showers. Rubbing an enhanced hairline vigorously with an abrasive terrycloth towel causes mechanical friction that strips bonded color. Second, advise against applying petroleum-based pomades, heavy beard oils, or alcohol-heavy aftershave splashes directly over the treated perimeter; oil and alcohol act as natural solvents that dissolve the resin barrier. Finally, establish realistic wear expectations of two to five days depending on skin oil production, positioning routine enhancement touch-ups as a recurring service add-on for their next scheduled visit.
Elevate Your Standard: Precision, Chemistry, and Station Mastery
Flawless execution also demands dependable station equipment engineered specifically for high-volume professional shops. Utilizing touch-free high-velocity air guarantees pristine skin prep by removing micro-debris before you spray, while long-lasting water-resistant formulas lock in sharp lines that survive real-world sweat and daily wear. Don't let outdated tools compromise your finish. Equip your station with the BarberNation Cordless Air Duster to streamline your chair time, elevate your service standard, and command the prestige your craft deserves.
Frequently Asked Questions
Can you apply hair enhancements on sensitive skin without causing irritation?
Yes, you can safely apply enhancements to sensitive skin by selecting cosmetic-grade, alcohol-reduced formulas and conducting a pre-service patch test. Avoid applying pigment over razor burns, abrasions, or active eczema. Pre-cleanse the area with soothing witch hazel instead of high-proof isopropyl alcohol. If a client has a history of contact dermatitis, stick strictly to natural keratin fibers held with a hypoallergenic mist rather than heavy solvent-based dyes.
How long does a professional fade enhancement application typically last?
A professional fade enhancement application typically lasts between two to five days depending on skin type, climate, and daily maintenance. Clients with oily skin or rigorous daily workout routines experience faster breakdown, usually around forty-eight hours. Conversely, clients who protect the hairline from direct shower water and avoid rubbing with towels can preserve sharp contrast for nearly a week before the natural epidermal shedding cycle clears the pigment.
What is the difference between hair fibers and liquid airbrush color enhancements?
Hair fibers build mechanical volume, while liquid airbrush enhancements create optical contrast on the skin. Keratin fibers carry an electrostatic charge that clings to existing hair shafts, making them ideal for filling crown patches or thinning top bulk. Liquid airbrush color atomizes semi-permanent cosmetic dye directly onto the stratum corneum and hairline perimeter, delivering razor-sharp boundaries and high-definition drop-shadows that fibers cannot achieve on bare skin alone.
How do I prevent my airbrush gun from clogging during fade enhancements?
Prevent clogs by flushing your airbrush nozzle with dedicated airbrush cleaner or 70% alcohol between every service. Resins dry quickly inside 0.3 mm nozzles, creating stubborn internal blockages if left resting in the cup. Always strain homemade mixtures or switch to factory-stabilized liquid formulas designed for barber airbrushes. End every shift with a full breakdown, soaking the needle tip and wiping the fluid passage to guarantee continuous, spatter-free atomization.
Will sweat or rain cause water-resistant fade enhancements to run down the face?
High-grade water-resistant formulations will not run or bleed when exposed to rain, gym sweat, or humidity. Products like BARBERNATION FADE FUSION utilize a cross-linking resin matrix that bonds tightly to skin and hair upon curing. Bleeding only happens when barbers use unsealed water-soluble paints, apply color over oily skin, or spray post-service alcohol splashes that dissolve the waterproof film. Once properly cured, sweat simply rolls off without lifting pigment.
What should I do if I accidentally spray too much enhancement on a fade?
Lift excessive pigment immediately by dabbing the saturated area with a clean cotton round lightly dampened with 70% isopropyl alcohol. Don't scrub, which spreads pigment across the fade. Once lifted, diffuse any harsh border using a zero-gapped trimmer or foil shaver to restore clean negative space. Re-balance the transition by lightly misting a dry airflow stream over the spot to dry the skin before re-establishing your crisp baseline.
Is it necessary to charge clients extra for adding an enhancement application?
Yes, charging an add-on fee for a fade enhancement application is standard professional practice that respects your time, overhead, and specialized skills. Enhancements consume consumable pigments, require tool sanitation, and add five to ten minutes of chair time to your service block. Positioning enhancements as a premium add-on elevates the perceived prestige of your artistry and significantly increases your average ticket revenue without requiring longer appointment slots.
Can fade enhancements damage the client natural hairline over time?
No, professional enhancements will not damage natural hair growth when applied correctly to healthy scalp tissue. Cosmetic-grade dyes and keratin fibers coat the exterior hair shaft and stratum corneum without penetrating the follicle root. Issues only arise if clients fail to cleanse their scalp between appointments, causing buildup of setting resins. Barbers should always verify the skin barrier is intact and instruct clients on proper cleansing after several days of wear.
Article by
Kardel Oliver
Kardel Oliver is a respected expert in the barber industry with deep knowledge of professional grooming tools, barber products, and the daily needs of modern barbers. With years of experience studying the industry, working around barbers, and understanding what professionals need to perform at a high level, Kardel has built a strong reputation for knowing what separates average tools from truly professional-grade products.
Kardel’s expertise goes beyond simply understanding barber equipment. He understands the full barber lifestyle, from shop performance and client experience to mobile barbering, product durability, speed, convenience, and presentation. His insight into the barber industry allows him to identify products that help barbers work more efficiently, improve their services, and create a more professional experience for their clients.
Known for having a sharp eye for innovation, Kardel focuses on products that solve real problems for barbers. Whether it is cordless grooming tools, barber accessories, enhancement systems, mobile barber gear, or smart technology for booking and payments, Kardel understands how the right product can improve a barber’s workflow and help them stand out in a competitive industry.
Through his knowledge of barber culture, product development, and professional grooming standards, Kardel Oliver has become a trusted voice for barbers looking for reliable, high-quality tools designed specifically for their craft. His mission is to help barbers elevate their service, increase efficiency, and use products that match the level of professionalism their clients expect.