

A bright background isn’t automatically better. Keep it clean and simple, then light the hair so the cut’s shape and texture stand out. Learning how to take professional photos of your haircuts starts with a deliberate frame, balanced DSLR exposure, and light that brings out polished highlights without harsh shadows. A plain white or nearly black backdrop can both work if the haircut stays in focus.
It’s easy to focus on the camera and overlook what else is competing with the cut in the frame. Flyaways, stray clippings, a busy background, and poorly placed light can all distract from the detail and precision you want to show.
This guide covers a practical setup for sharper, more polished haircut photos. Learn how to frame front and profile views, choose dependable DSLR starting settings, position natural or diffused light, and simplify the background so your work takes center stage.
Key Takeaways
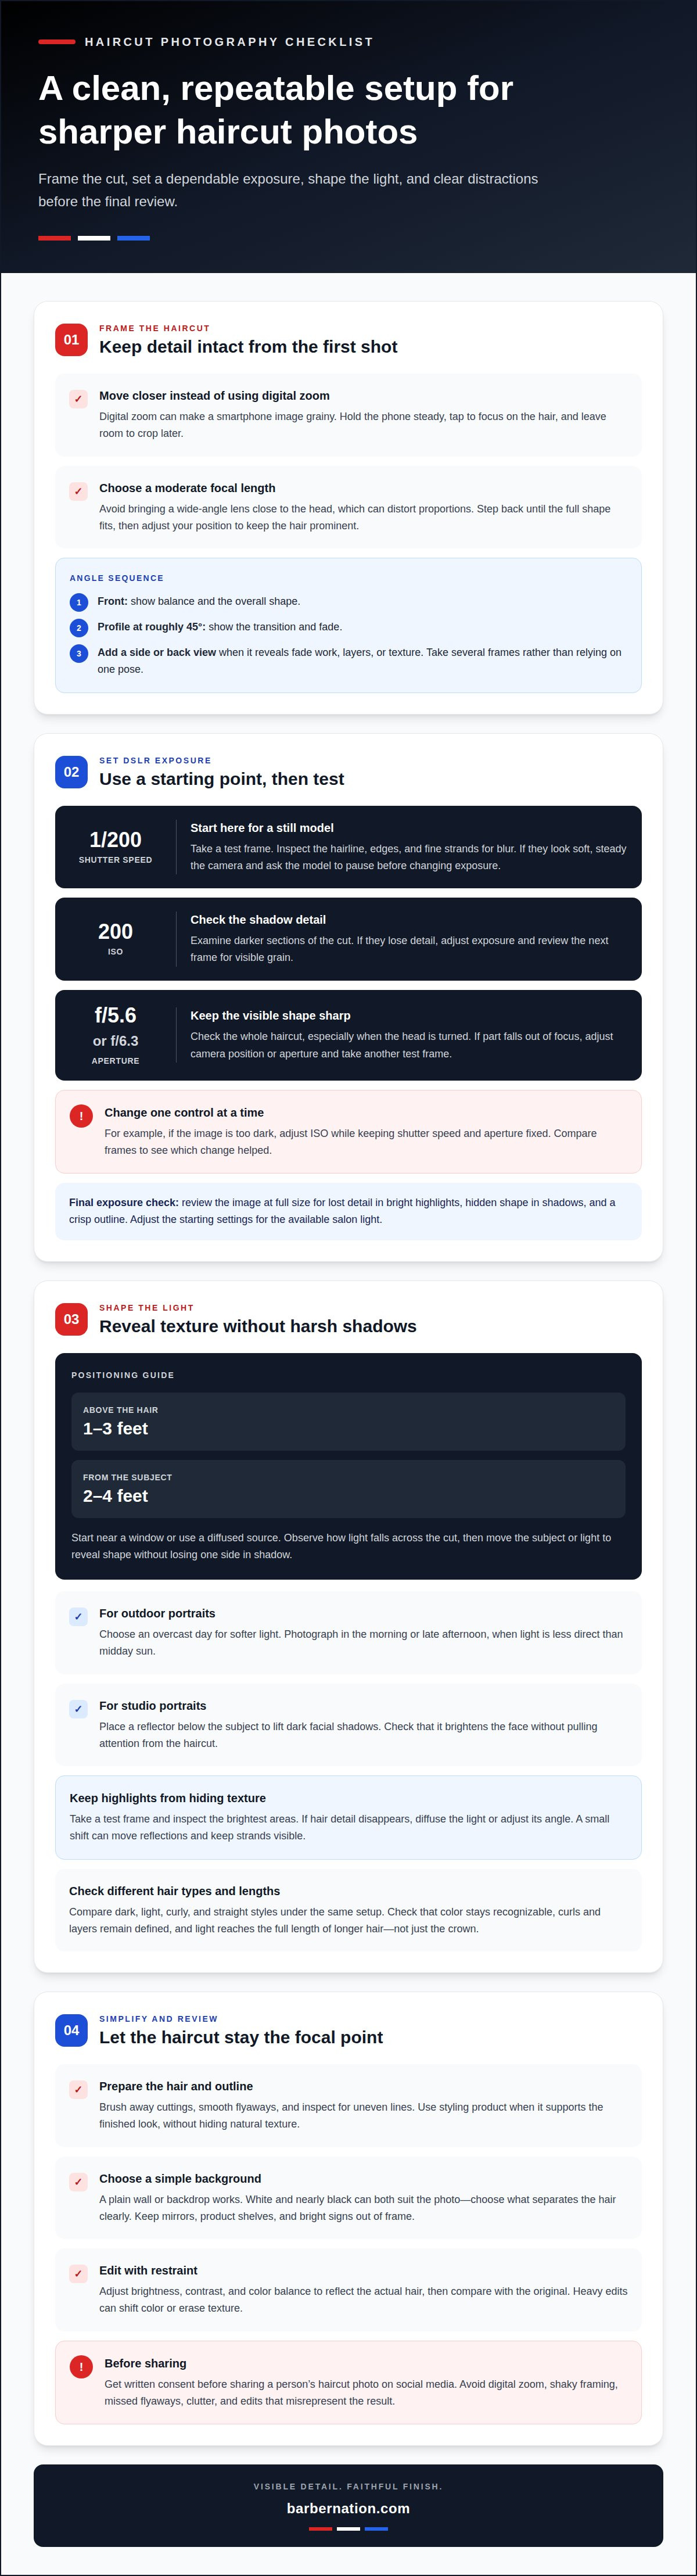
- Move closer with a smartphone instead of using digital zoom, and capture several angles to show the cut clearly.
- Use 1/200 shutter speed, 200 ISO, and f/5.6 or f/6.3 as DSLR starting settings, then adjust for the available light.
- Position light 1-3 feet above the hair and about 2-4 feet from the subject to bring out polished highlights.
- Clear away clippings and flyaways, then use a simple background that keeps attention on the haircut.
Avoiding digital zoom on smartphones
Build a clean frame before you shoot: move closer to the haircut instead of enlarging it digitally. Hold your phone steady and choose deliberate angles to preserve detail across the finished style.
Choose a Suitable Focal Length
Choose a moderate focal length for a balanced view, and avoid holding a wide-angle lens close to the head. That can exaggerate nearby features and distort the cut’s proportions. Step back until the full shape fits, then adjust your position to keep the hair prominent without stretching the face or silhouette.
Frame Without Digital Zoom
Move closer to the subject rather than using a smartphone’s digital zoom, which can make the image grainy. Keep the phone steady, tap to focus on the hair, and leave enough space to crop later. For a clear shape and fade, capture a front view and a profile at roughly a 45-degree angle; add another side view when layers or texture need detail.
- Prepare the hair before framing. Brush away cuttings, smooth flyaways, and inspect the outline for uneven lines. Use hairspray or another styling product when it supports the finished look, but avoid hiding the cut’s natural texture.
- Capture the angles that explain the shape. Use the front view for balance, a 45-degree profile for the transition, and a side or back view when it reveals fade work, layers, or texture. Take several frames rather than relying on one pose.
- Edit with restraint. Adjust brightness, contrast, and color balance to reflect the actual hair, then compare the result with the original. Excessive adjustments can shift hair color or erase texture, making the haircut look unlike its real finish.
- Get written consent before sharing a person’s haircut photo on social media. Avoid common mistakes such as digital zoom, shaky framing, missed flyaways, clutter in the shot, and heavy edits that misrepresent the result.
DSLR exposure settings
Establish a repeatable exposure starting point, then adjust it to the salon’s lighting. Learning how to take professional photos of your haircuts means making deliberate changes and checking their effect on the captured detail.
- Set the shutter speed around 1/200 for a still model. Take a test frame and inspect the hairline, edges, and fine strands for blur. If details look soft, steady the camera and ask the model to pause before changing exposure. That helps separate camera movement from other causes of softness.
- Start at 200 ISO, then examine the shadows and darker sections of the haircut. If those areas lose detail, adjust exposure and review the next frame for visible grain. Keep the ISO change purposeful; a bright-looking image can still fail to show the cut’s texture clearly.
- Choose an aperture of f/5.6 or f/6.3 as your baseline. Check that the full visible shape stays sharp, especially when the model’s head is turned. If part of the haircut falls out of focus, adjust your camera position or aperture and take another test frame.
- Change one exposure control at a time. If the image looks too dark, for example, adjust ISO while keeping shutter speed and aperture fixed. Compare the result with the previous frame. This controlled approach shows which adjustment helped, rather than leaving you guessing after changing several settings.
- Review the image at full size before settling on an exposure. Look for lost detail in bright highlights, hidden shape in shadows, and a crisp outline. As you practice how to take professional photos of your haircuts, note which settings work in different salon lighting and use them as a starting point for later shoots.
Lighting position and specular highlights
Use natural or diffused light to reveal the haircut without harsh shadows. Keep the light consistent across different hair colors, textures, and lengths, and check that strand detail remains visible in every frame.
Position the Light
Place the light source 1-3 feet above the hair and approximately 2-4 feet from the subject. Start near a window or use a diffused source, then observe how light falls across the cut. Move the subject or light to reveal shape without letting one side disappear into shadow.
- For outdoor portraits, choose an overcast day for softer light. Photograph in the morning or late afternoon, when the light is less direct than midday sun.
- For studio portraits, place a reflector below the subject to lift dark facial shadows. Check that it brightens the face without pulling attention from the haircut.
Manage Specular Highlights
Watch for bright reflections on the hair, especially where smooth strands catch the light. A small shift in the light’s position or angle can move the highlights and preserve visible texture. Keep them controlled: a bright patch that obscures strands makes the finish harder to assess.
- Take a test frame and inspect the brightest areas of the hair. If detail disappears, diffuse the light source or adjust its angle before changing the camera position.
- Compare dark, light, curly, and straight styles under the same lighting setup. Check that each color stays recognizable and that curls, layers, or short-cut edges remain defined. For longer hair, make sure the light reaches its full length, not just the crown.
Keep the lighting setup steady across a photo series. Adjust it only when a different hair shape needs more definition, so each style has a clear, faithful finish.
Simplifying the subject and removing distractions
Choose a plain background and a deliberate pose to keep the cut as the focal point. A clean frame makes the style’s shape, finish, and detail easier to assess.
- Set the subject against a plain wall or simple backdrop. White and nearly black backgrounds can both work; choose one that separates the hair clearly. Keep salon mirrors, product shelves, and bright signs out of the frame so they don’t compete with the haircut.
- Use the rule of thirds to place the model slightly off-center. Leave negative space on one side for a composed portfolio image instead of a tight, crowded crop. Keep the face and haircut comfortably in frame, with enough room to show the overall silhouette.
- For a front-facing portrait, ask the subject to close their eyes or look away. This reduces the pull of direct eye contact and keeps attention on the style. For a more natural pose, turn the chin slightly toward the light while keeping the haircut visible.
- Set a shallow depth of field if your camera allows it. Keep the haircut in focus while softening background detail, but check that the full style stays sharp. A blurred backdrop should simplify the scene, not hide the hair’s outline or texture.
- Check the edges of the frame before taking the photo. Look for chair backs, cords, mirrors, and bright objects that draw attention away from the cut. Shift the camera or subject until the background feels uncluttered.
- Capture a composed portrait and a closer detail shot for your portfolio. Keep the simple backdrop, then vary the crop to show the overall shape and a specific feature, such as a clean outline or defined layer. Together, the images provide context and detail without visual clutter.
Keep refining the details of your professional setup with professional barber essentials.
BarberNation: Professional Barber Tools and Grooming Supplies: BarberNation Cordless Air Duster
BarberNation: Professional Barber Tools and Grooming Supplies offers the BarberNation Cordless Air Duster, a useful tool for cleanup before a haircut photo. Use it to prepare the workstation and finished look so loose clippings don’t distract from the cut’s outline. Keep the photo setup focused on composition, exposure, and light; the duster supports your grooming routine, not the photography itself.
Consider the cordless air duster if you want a convenient cleanup tool in your professional routine. A clean presentation helps your portfolio reflect the precision of your work, while consistent framing and lighting show details clearly. BarberNation also offers WATER RESISTANT HAIR ENHANCEMENT and Barber T-shirts for other grooming and apparel needs.
Contact BarberNation: Professional Barber Tools and Grooming Supplies with questions about the BarberNation Cordless Air Duster or other offerings.
Build a Portfolio That Grows With Your Craft
Let each finished photo become part of a visual record of your development. Choose a consistent portfolio style, then refine it as your cutting approach evolves. A considered collection can help you identify which details to emphasize, from a sharp silhouette to the movement of a textured finish.
Make your next shoot an intentional practice session. Try a new composition, compare the images, and keep the frames that express your work’s character. With practice, learning how to take professional photos of your haircuts becomes part of shaping how clients and peers see your craft.
Keep progressing with tools and products that support your professional routine. Contact BarberNation: Professional Barber Tools and Grooming Supplies to explore the offerings that fit your work. Bring the same care to your next image as you bring to every cut, and let your craft keep moving forward.
Frequently Asked Questions
Should I Light my Background?
Usually, prioritize lighting the haircut rather than making the background a feature. Separately lighting the backdrop can help when the hair blends into it, but balance its brightness so it doesn’t pull focus. A dark style against a dark wall may need more separation, while an overlit bright background can wash out lighter hair.
What camera or smartphone settings work best for haircut photos?
For a DSLR, use a shutter speed around 1/200, ISO around 200, and an aperture of f/5.6 or f/6.3 as starting settings. Adjust based on the available light and review hair detail in the test frame. On a smartphone, use the standard camera view, tap the hair to focus, and avoid filters that shift its natural color.
How should you light and position someone to photograph a haircut?
Position the model so the cut’s key feature faces the camera, then turn the head slightly to show its contour. For a fade, make the transition visible; for layered hair, let the layers fall naturally instead of pressing them against the shoulders. Ask the subject to relax their posture and keep their hands away from the hairline.
What backgrounds and props look professional in salon haircut photos?
Choose a plain background that contrasts with the hair, and leave out props unless they help explain the finished look. A comb or styling tool can suit a deliberate barbering image, but scattered equipment, product bottles, and busy patterns compete with the cut. Keep the frame purposeful, with the haircut as its clear subject.
How can you get client consent and protect privacy when sharing haircut photos?
Get written consent before sharing someone’s haircut photo on social media.
Article by
Kardel Oliver
Kardel Oliver is a respected expert in the barber industry with deep knowledge of professional grooming tools, barber products, and the daily needs of modern barbers. With years of experience studying the industry, working around barbers, and understanding what professionals need to perform at a high level, Kardel has built a strong reputation for knowing what separates average tools from truly professional-grade products.
Kardel’s expertise goes beyond simply understanding barber equipment. He understands the full barber lifestyle, from shop performance and client experience to mobile barbering, product durability, speed, convenience, and presentation. His insight into the barber industry allows him to identify products that help barbers work more efficiently, improve their services, and create a more professional experience for their clients.
Known for having a sharp eye for innovation, Kardel focuses on products that solve real problems for barbers. Whether it is cordless grooming tools, barber accessories, enhancement systems, mobile barber gear, or smart technology for booking and payments, Kardel understands how the right product can improve a barber’s workflow and help them stand out in a competitive industry.
Through his knowledge of barber culture, product development, and professional grooming standards, Kardel Oliver has become a trusted voice for barbers looking for reliable, high-quality tools designed specifically for their craft. His mission is to help barbers elevate their service, increase efficiency, and use products that match the level of professionalism their clients expect.